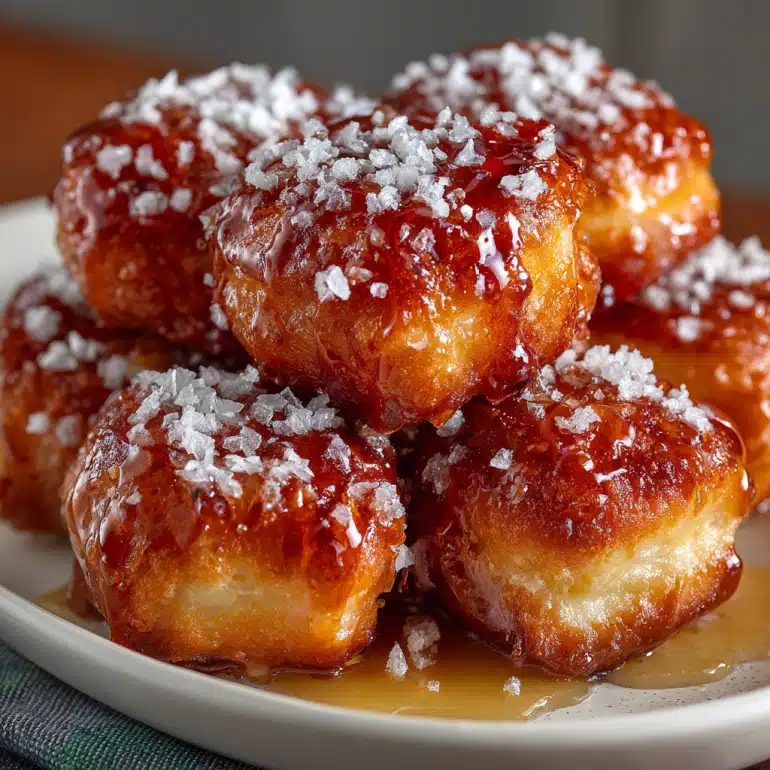
Introduction to Glazed Buttermilk Beignets
Hey there, fellow home cooks! If you’re anything like me, you know that life can get a bit hectic, especially when juggling family, work, and everything in between. That’s why I’m excited to share my recipe for Glazed Buttermilk Beignets—a delightful treat that’s not only easy to whip up but also brings a little joy to your day. Imagine fluffy, sweet bites of heaven that can impress your loved ones or simply brighten your afternoon. These beignets are perfect for a quick breakfast, a cozy dessert, or even a fun weekend project with the kids. Let’s dive into this delicious adventure together!
Why You’ll Love This Glazed Buttermilk Beignets
Let’s be honest—who doesn’t love a treat that’s both easy to make and utterly delicious? These Glazed Buttermilk Beignets are a game-changer for busy days. They come together quickly, and the taste? Oh, it’s like a warm hug for your taste buds! Plus, they’re perfect for any occasion, whether you’re hosting a brunch or just need a sweet pick-me-up. Trust me, your family will be begging for more!
Ingredients for Glazed Buttermilk Beignets
Before we roll up our sleeves and get cooking, let’s gather our ingredients for these delightful Glazed Buttermilk Beignets. Each component plays a vital role in creating that fluffy, sweet goodness we all crave. Here’s what you’ll need:
- Active dry yeast: This little powerhouse helps our beignets rise and become light and airy. Make sure it’s fresh for the best results!
- Warm buttermilk: Buttermilk adds a tangy flavor and moisture, making the beignets tender. If you don’t have buttermilk, you can easily make a substitute by mixing milk with a splash of vinegar or lemon juice.
- Sugar: A touch of sweetness is essential. It not only flavors the dough but also helps with browning during frying.
- Unsalted butter: Melted butter adds richness and flavor. If you’re watching your sodium intake, using unsalted is a great choice.
- Large egg: Eggs help bind the ingredients together and contribute to the beignets’ fluffy texture.
- All-purpose flour: This is the base of our dough. It provides structure and helps create that perfect chewy texture. You can substitute with gluten-free flour if needed.
- Salt: Just a pinch enhances the flavors and balances the sweetness.
- Oil for frying: Choose a neutral oil with a high smoke point, like vegetable or canola oil, for frying. This ensures your beignets cook evenly without burning.
- Powdered sugar: This is the star of our glaze! It gives that sweet, melt-in-your-mouth finish we all love.
- Milk: A splash of milk in the glaze helps achieve that perfect consistency. You can use any milk you have on hand—dairy or non-dairy works!
- Vanilla extract: A hint of vanilla adds a lovely aroma and flavor to the glaze, making it even more irresistible.
For exact measurements, don’t forget to check the bottom of the article where you can find everything listed for easy printing. Now that we have our ingredients ready, let’s get cooking!
How to Make Glazed Buttermilk Beignets
Now that we have our ingredients ready, let’s dive into the fun part—making these delightful Glazed Buttermilk Beignets! Follow these simple steps, and you’ll be enjoying warm, fluffy beignets in no time. Trust me, the process is just as enjoyable as the end result!
Step 1: Prepare the Yeast Mixture
First things first, let’s wake up that yeast! In a bowl, dissolve the active dry yeast in the warm buttermilk. Make sure the buttermilk is warm, not hot—think cozy bath temperature. Let it sit for about 5 minutes. You’ll know it’s ready when it gets all frothy and bubbly. This is the magic that will make our beignets rise!
Step 2: Combine Ingredients
Once your yeast mixture is frothy, it’s time to add some sweetness! Stir in the sugar, melted butter, and the large egg. Mix everything together until it’s well combined. The melted butter will add a rich flavor, and the egg will help bind everything together. It’s like a little party in your bowl!
Step 3: Form the Dough
Now, let’s get our hands a bit messy! Gradually add the all-purpose flour and salt to the mixture. I like to do this in batches to avoid a flour explosion. Mix until a soft dough forms. It should be slightly sticky but manageable. If it’s too sticky, don’t hesitate to sprinkle in a bit more flour. We want a dough that’s easy to work with!
Step 4: Knead and Rise
Time to knead! Lightly flour your countertop and turn out the dough. Knead it for about 5–6 minutes. You want to develop that gluten, which gives our beignets their lovely texture. Once it’s smooth and elastic, place the dough in a greased bowl. Cover it with a clean kitchen towel and let it rise in a warm spot for about an hour, or until it doubles in size. This is the perfect time to catch up on your favorite show or enjoy a cup of coffee!
Step 5: Shape the Beignets
After the dough has risen, it’s time to shape our beignets! Roll out the dough on a floured surface to about ½-inch thickness. Use a sharp knife or pizza cutter to cut it into squares. Don’t worry about making them perfect; the charm of homemade beignets is in their rustic look. Just aim for about 2–3 inches per side, and you’re good to go!
Step 6: Fry the Beignets
Now for the fun part—frying! Heat oil in a deep fryer or a large pot to 350°F (175°C). If you don’t have a thermometer, you can test the oil by dropping in a small piece of dough; it should sizzle and rise to the surface. Fry the beignets in batches, making sure not to overcrowd the pot. Cook them for about 2–3 minutes on each side until they’re golden brown. Use a slotted spoon to remove them and let them drain on paper towels. The smell will be heavenly!
Step 7: Prepare the Glaze
While the beignets are cooling, let’s whip up that delicious glaze! In a bowl, whisk together the powdered sugar, milk, and vanilla extract until smooth. You want a nice, pourable consistency. If it’s too thick, add a splash more milk. This glaze is what takes our beignets from good to absolutely irresistible!
Step 8: Glaze and Serve
Finally, it’s time to glaze those warm beignets! Dip each one into the glaze, making sure to coat it well. Let any excess glaze drip off before placing them on a wire rack or plate. Serve them warm, and watch as your family devours these fluffy, sweet treats. Trust me, they won’t last long!
Tips for Success
- Make sure your yeast is fresh for the best rise—check the expiration date!
- Keep the buttermilk warm, not hot, to avoid killing the yeast.
- Don’t rush the rising time; it’s crucial for fluffy beignets.
- Fry in small batches to maintain oil temperature and ensure even cooking.
- Serve immediately for the best taste and texture—trust me, they’re best fresh!
Equipment Needed
- Mixing bowls: A large bowl for mixing and a smaller one for the glaze. Any size will do!
- Rolling pin: If you don’t have one, a wine bottle works in a pinch!
- Deep fryer or large pot: A heavy-bottomed pot is perfect for frying.
- Slotted spoon: This helps you safely remove the beignets from the hot oil.
- Wire rack: Great for cooling the beignets, but a plate works too!
Variations

- Chocolate Glazed: Add cocoa powder to the glaze for a rich chocolate flavor that will satisfy any sweet tooth!
- Cinnamon Sugar Coating: Instead of glazing, toss the warm beignets in a mixture of cinnamon and granulated sugar for a delightful twist.
- Fruit-Flavored Glaze: Mix in some fruit puree, like raspberry or strawberry, into the glaze for a fruity kick.
- Maple Glaze: Substitute maple syrup for milk in the glaze for a deliciously sweet and earthy flavor.
- Gluten-Free Option: Use a gluten-free all-purpose flour blend to make these beignets suitable for those with gluten sensitivities.
- Vegan Beignets: Replace the egg with a flax egg (1 tablespoon ground flaxseed mixed with 2.5 tablespoons water) and use plant-based butter for a vegan-friendly version.
Serving Suggestions
- Fresh Fruit: Serve with a side of mixed berries or sliced bananas for a refreshing contrast.
- Coffee or Tea: Pair your beignets with a warm cup of coffee or herbal tea for a cozy treat.
- Presentation: Dust with extra powdered sugar before serving for a beautiful finish.
- Ice Cream: For a decadent dessert, serve warm beignets alongside a scoop of vanilla ice cream.
FAQs about Glazed Buttermilk Beignets
Got questions about these delightful Glazed Buttermilk Beignets? You’re not alone! Here are some common queries I’ve encountered, along with my answers to help you on your beignet-making journey.
1. Can I make the dough ahead of time?
Absolutely! You can prepare the dough and let it rise, then cover it tightly and refrigerate it for up to 24 hours. Just remember to bring it back to room temperature before rolling and frying. This is a great time-saver for busy mornings!
2. What if I don’t have buttermilk?
No worries! If you don’t have buttermilk on hand, you can easily make a substitute. Just mix one cup of milk with a tablespoon of vinegar or lemon juice. Let it sit for about 5 minutes, and voilà! You’ve got your homemade buttermilk ready for those Glazed Buttermilk Beignets.
3. How do I store leftover beignets?
Leftover beignets can be stored in an airtight container at room temperature for up to two days. However, they’re best enjoyed fresh! If you want to keep them longer, consider freezing them. Just make sure to glaze them after thawing for the best taste.
4. Can I use a different type of glaze?
Definitely! While the classic glaze is delicious, feel free to get creative. You can try a chocolate glaze, maple glaze, or even a fruity glaze to switch things up. The Glazed Buttermilk Beignets are versatile, and your family will love the variety!
5. What’s the best way to reheat beignets?
The best way to reheat beignets is in the oven. Preheat your oven to 350°F (175°C) and place the beignets on a baking sheet. Heat for about 5–7 minutes until they’re warm and slightly crispy again. This method helps maintain their fluffy texture!
Final Thoughts
Making Glazed Buttermilk Beignets is more than just a cooking project; it’s a delightful experience that brings joy to your kitchen and smiles to your family’s faces. The aroma of frying dough fills the air, creating a warm, inviting atmosphere that feels like a hug. Whether you’re enjoying them fresh with a cup of coffee or sharing them with loved ones, these beignets are sure to create sweet memories. So, roll up your sleeves, embrace the mess, and indulge in the simple pleasure of homemade treats. Trust me, you’ll be glad you did!
“`
Print
Glazed Buttermilk Beignets are a delightful treat!
- Total Time: 1 hour 35 minutes
- Yield: Approximately 12 beignets 1x
- Diet: Vegetarian
Description
Glazed Buttermilk Beignets are a delightful treat that are fluffy, sweet, and perfect for any occasion.
Ingredients
- 2 ¼ tsp active dry yeast
- ¾ cup warm buttermilk
- ¼ cup sugar
- 3 tbsp unsalted butter, melted
- 1 large egg
- 3 cups all-purpose flour
- ½ tsp salt
- Oil for frying
- 1 cup powdered sugar (for glaze)
- 2–3 tbsp milk (for glaze)
- ½ tsp vanilla extract (for glaze)
Instructions
- In a bowl, dissolve yeast in warm buttermilk and let sit for 5 minutes.
- Stir in sugar, melted butter, and egg until combined.
- Gradually add flour and salt, mixing until a soft dough forms.
- Knead the dough on a floured surface for 5–6 minutes, then place in a greased bowl, cover, and let rise for 1 hour or until doubled.
- Roll out dough to ½-inch thickness and cut into squares.
- Heat oil in a deep fryer or large pot to 350°F (175°C). Fry beignets in batches until golden brown on both sides, about 2–3 minutes. Drain on paper towels.
- For the glaze, whisk powdered sugar, milk, and vanilla until smooth.
- Dip warm beignets into the glaze and let set briefly.
- Serve warm and enjoy these fluffy, sweet treats!
Notes
- Ensure the oil is at the correct temperature for frying to achieve the best texture.
- Beignets are best served fresh and warm.
- Prep Time: 15 minutes
- Cook Time: 20 minutes
- Category: Dessert
- Method: Frying
- Cuisine: French
Nutrition
- Serving Size: 1 beignet
- Calories: 150
- Sugar: 10g
- Sodium: 50mg
- Fat: 7g
- Saturated Fat: 4g
- Unsaturated Fat: 2g
- Trans Fat: 0g
- Carbohydrates: 20g
- Fiber: 0g
- Protein: 2g
- Cholesterol: 30mg
Leave a Comment