gutenberg
Introduction to Delicious Christmas Cookies with Cool Whip
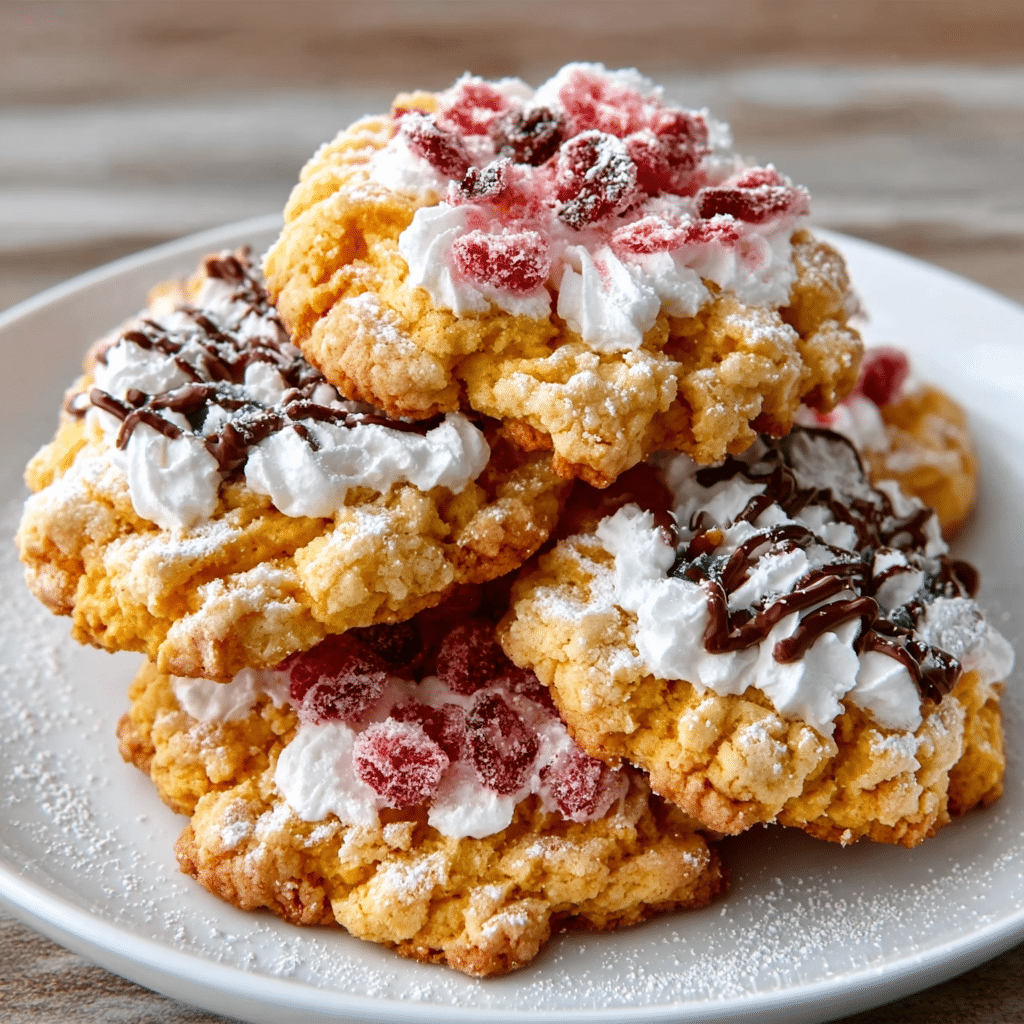
Ah, the holiday season! It’s that magical time of year when the air is filled with the scent of pine and freshly baked goodies. If you’re like me, you want to impress your loved ones without spending hours in the kitchen. That’s where these Delicious Christmas Cookies with Cool Whip come in! They’re quick, easy, and oh-so-tasty, making them the perfect treat for busy days filled with holiday cheer. Plus, who can resist a cookie that’s soft, fluffy, and sprinkled with festive colors? Let’s dive into this delightful recipe that will surely become a holiday favorite!
Why You’ll Love This Delicious Christmas Cookies with Cool Whip
These Delicious Christmas Cookies with Cool Whip are a lifesaver for busy women like us! They come together in a snap, making them perfect for last-minute holiday gatherings or cozy family nights. The taste? Oh, it’s a delightful blend of sweetness and fluffiness that will have everyone asking for seconds. Plus, the vibrant sprinkles add a festive touch that brightens up any cookie platter. What’s not to love?
Ingredients for Delicious Christmas Cookies with Cool Whip
Let’s gather our ingredients for these Delicious Christmas Cookies with Cool Whip. You’ll find that most of these items are staples in your pantry, making it easy to whip up a batch whenever the holiday spirit strikes!
- All-purpose flour: This is the foundation of our cookies, giving them structure and a lovely texture. You can use whole wheat flour for a healthier twist!
- Baking powder: This little leavening agent helps our cookies rise, making them light and fluffy. It’s essential for that perfect cookie texture.
- Baking soda: Another leavening agent, baking soda works with the acidic ingredients to create a nice lift. It also helps with browning, giving our cookies that golden edge.
- Salt: Just a pinch enhances the sweetness and balances the flavors. It’s like the secret handshake of the baking world!
- Unsalted butter: Softened butter is key for creaming with sugar, creating that light and airy base. If you’re dairy-free, feel free to substitute with a plant-based butter.
- Granulated sugar: This sweetener adds sweetness and helps with the cookie’s texture. You can swap some for brown sugar for a deeper flavor.
- Large egg: Eggs bind the ingredients together and add moisture. If you’re looking for an egg-free option, try using a flax egg instead!
- Vanilla extract: This classic flavoring adds warmth and depth to our cookies. You can also experiment with almond extract for a fun twist!
- Cool Whip: The star of our recipe! This whipped topping adds a delightful fluffiness and moisture to the cookies. If you prefer a dairy-free option, look for a non-dairy whipped topping.
- Powdered sugar: Used for rolling the cookie dough balls, it gives them a sweet, snowy finish. It’s like a little sprinkle of holiday magic!
- Red and green sprinkles (optional): These festive sprinkles are the cherry on top, adding a pop of color and fun to your cookies. Feel free to get creative with your favorite holiday-themed sprinkles!
For exact measurements, check the bottom of the article where you can find everything listed for easy printing. Now that we have our ingredients ready, let’s get to baking these delightful cookies!
How to Make Delicious Christmas Cookies with Cool Whip
Now that we have our ingredients ready, let’s dive into the fun part—making these Delicious Christmas Cookies with Cool Whip! Follow these simple steps, and you’ll have a batch of festive cookies in no time. Trust me, your family will be begging for more!
Step 1: Preheat and Prepare
First things first, preheat your oven to 350°F (175°C). This is crucial for getting those cookies just right! While the oven warms up, line a baking sheet with parchment paper. This little trick prevents the cookies from sticking and makes cleanup a breeze. You’ll thank yourself later!
Step 2: Mix Dry Ingredients
In a medium bowl, whisk together the all-purpose flour, baking powder, baking soda, and salt. This step is important because it ensures that all the leavening agents are evenly distributed. Plus, it helps to aerate the flour, making your cookies light and fluffy. Set this bowl aside for now; we’ll come back to it shortly!
Step 3: Cream Butter and Sugar
In a large mixing bowl, cream the softened butter and granulated sugar together until the mixture is light and fluffy. This usually takes about 3-4 minutes. You can use a hand mixer or a stand mixer for this step. The goal is to incorporate air into the butter, which will help your cookies rise beautifully. It’s like giving your cookies a little spa treatment!
Step 4: Add Egg and Vanilla
Next, beat in the large egg and vanilla extract until everything is well combined. The egg adds moisture and helps bind the ingredients together, while the vanilla brings a warm, inviting flavor. If you’re feeling adventurous, you can even add a splash of almond extract for a delightful twist!
Step 5: Combine Wet and Dry Ingredients
Now it’s time to bring the two mixtures together! Gradually add the dry ingredients to the wet mixture, mixing until just combined. Be careful not to overmix; we want our cookies to stay tender and soft. A few flour streaks are okay—trust me, they’ll come together in the next step!
Step 6: Fold in Cool Whip
Here comes the magic ingredient—gently fold in the Cool Whip until the dough is smooth. This is what gives our cookies that delightful fluffiness! Use a spatula to carefully incorporate the Cool Whip without deflating it too much. It’s like adding a cloud to your cookie dough!
Step 7: Shape the Cookies
Now, let’s get our hands a little messy! Place the powdered sugar in a shallow dish. Using a cookie scoop or a tablespoon, scoop out the dough and roll it into balls. Then, roll each ball in the powdered sugar until fully coated. This gives the cookies a sweet, snowy finish that’s just perfect for the holidays. Place them on the prepared baking sheet, spacing them about 2 inches apart. They’ll spread a bit while baking, so give them some room to breathe!
Step 8: Bake the Cookies
Finally, pop those cookies in the oven and bake for 10-12 minutes or until the edges are lightly golden. Keep an eye on them; every oven is a little different! Once they’re done, let them cool on the baking sheet for about 5 minutes before transferring them to a wire rack to cool completely. This step is crucial for achieving that perfect texture—soft in the middle and slightly crisp on the edges. Your kitchen will smell heavenly, and your family will be eagerly waiting for a taste!
Tips for Success
- Make sure your butter is softened to room temperature for easy creaming.
- Don’t skip the chilling step if you have time; it helps the cookies hold their shape.
- Use a cookie scoop for uniform cookie sizes—this ensures even baking.
- Experiment with different sprinkles or add-ins like chocolate chips for a fun twist!
- Store leftover cookies in an airtight container to keep them fresh.
Equipment Needed
- Mixing bowls: A set of various sizes is handy; you can use any large bowl if you’re in a pinch.
- Electric mixer: A hand mixer works great, but a stand mixer can save you time and effort.
- Baking sheet: A standard cookie sheet is perfect; just line it with parchment paper for easy cleanup.
- Cookie scoop: If you don’t have one, a tablespoon will do the trick!
- Wire rack: Essential for cooling; you can use a plate if you’re short on space.
Variations
- Chocolate Chip Delight: Add 1 cup of mini chocolate chips to the dough for a rich, chocolatey twist that everyone will love!
- Nutty Flavor: Incorporate 1/2 cup of chopped nuts, like walnuts or pecans, for a delightful crunch and added flavor.
- Minty Fresh: Swap out the vanilla extract for peppermint extract to create a refreshing minty cookie that’s perfect for the holidays.
- Gluten-Free Option: Use a gluten-free all-purpose flour blend to make these cookies gluten-free without sacrificing taste.
- Vegan Version: Substitute the egg with a flax egg (1 tablespoon ground flaxseed mixed with 2.5 tablespoons water) and use a dairy-free whipped topping for a vegan-friendly treat.
- Spiced Cookies: Add 1 teaspoon of cinnamon or ginger to the dry ingredients for a warm, spiced flavor that’s perfect for winter.
Serving Suggestions
- Pair these Delicious Christmas Cookies with Cool Whip with a warm cup of hot cocoa or spiced tea for a cozy treat.
- Present them on a festive platter, garnished with fresh mint leaves or seasonal fruits for a pop of color.
- For a fun twist, serve alongside a scoop of vanilla ice cream for an indulgent dessert experience!
FAQs about Delicious Christmas Cookies with Cool Whip
As we dive into the world of baking these Delicious Christmas Cookies with Cool Whip, you might have a few questions swirling around in your mind. Don’t worry; I’ve got you covered! Here are some common queries that pop up when making these festive treats.
1. Can I use a different type of whipped topping instead of Cool Whip?
Absolutely! While Cool Whip is a fantastic choice for its fluffiness, you can substitute it with any similar whipped topping. Just make sure it’s thawed and ready to go. If you’re looking for a dairy-free option, there are several non-dairy whipped toppings available that work just as well!
2. How do I store the cookies to keep them fresh?
To keep your Delicious Christmas Cookies with Cool Whip fresh, store them in an airtight container at room temperature. They should stay delicious for about a week. If you want to keep them longer, you can freeze them! Just make sure to layer them with parchment paper to prevent sticking.
3. Can I make the dough ahead of time?
Yes, you can! If you’re short on time, feel free to make the dough ahead of time. Just cover it tightly and refrigerate it for up to 2 days. When you’re ready to bake, let it sit at room temperature for about 15 minutes before shaping and baking. It’s a great way to save time during the busy holiday season!
4. What can I do if my cookies spread too much while baking?
If your cookies spread too much, it could be due to a few reasons. Make sure your butter is softened but not melted, as melted butter can lead to overly flat cookies. Also, chilling the dough for about 30 minutes before baking can help them hold their shape better. If all else fails, just call them “cookie puddles”—they’ll still taste amazing!
5. Can I add different flavors to the cookies?
Definitely! These Delicious Christmas Cookies with Cool Whip are super versatile. You can add different extracts like almond or peppermint for a unique twist. You can also mix in spices like cinnamon or nutmeg for a warm, festive flavor. Get creative and make them your own!
Final Thoughts
Making these Delicious Christmas Cookies with Cool Whip is more than just baking; it’s about creating sweet memories with family and friends. The joy of pulling a tray of warm, fluffy cookies from the oven, the laughter shared over sprinkles, and the smiles as everyone takes a bite—these are the moments that make the holiday season special. So, whether you’re hosting a gathering or simply treating your loved ones, these cookies are sure to bring a sprinkle of joy to your festivities. Happy baking, and may your holidays be filled with love and delicious treats!
“`
Print
Delicious Christmas Cookies with Cool Whip to Impress!
- Total Time: 27 minutes
- Yield: 24 cookies 1x
- Diet: Vegetarian
Description
Delicious Christmas Cookies with Cool Whip to Impress!
Ingredients
- 2 cups all-purpose flour
- 1 teaspoon baking powder
- 1/2 teaspoon baking soda
- 1/4 teaspoon salt
- 1/2 cup unsalted butter, softened
- 1 cup granulated sugar
- 1 large egg
- 1 teaspoon vanilla extract
- 1 cup Cool Whip, thawed
- 1/2 cup powdered sugar (for rolling)
- 1/2 cup red and green sprinkles (optional)
Instructions
- Preheat your oven to 350°F (175°C) and line a baking sheet with parchment paper.
- In a medium bowl, whisk together the flour, baking powder, baking soda, and salt. Set aside.
- In a large bowl, cream the softened butter and granulated sugar together until light and fluffy, about 3-4 minutes.
- Beat in the egg and vanilla extract until well combined.
- Gradually add the dry ingredients to the wet mixture, mixing until just combined.
- Gently fold in the Cool Whip until the dough is smooth.
- Place the powdered sugar in a shallow dish. Using a cookie scoop or tablespoon, scoop out the dough and roll it into balls.
- Roll each ball in the powdered sugar until fully coated, then place them on the prepared baking sheet, spacing them about 2 inches apart.
- If desired, sprinkle the tops with red and green sprinkles for a festive touch.
- Bake for 10-12 minutes or until the edges are lightly golden. Allow the cookies to cool on the baking sheet for 5 minutes before transferring them to a wire rack to cool completely.
Notes
- For a fun twist, try adding 1/2 teaspoon of almond extract for a different flavor.
- You can also substitute the Cool Whip with a similar whipped topping for a dairy-free option.
- Prep Time: 15 minutes
- Cook Time: 12 minutes
- Category: Dessert
- Method: Baking
- Cuisine: American
Nutrition
- Serving Size: 1 cookie
- Calories: 110
- Sugar: 6g
- Sodium: 50mg
- Fat: 5g
- Saturated Fat: 3g
- Unsaturated Fat: 2g
- Trans Fat: 0g
- Carbohydrates: 15g
- Fiber: 0g
- Protein: 1g
- Cholesterol: 15mg







Leave a Comment