gutenberg
Introduction to Pizza de Pão
Hey there, fellow food lovers! If you’re anything like me, you know that life can get pretty hectic, especially when juggling family, work, and everything in between. That’s why I’m excited to share my go-to recipe for Pizza de Pão. This delightful savory bread topped with cheese and pepperoni is not just a treat for the taste buds; it’s also a quick solution for those busy weeknights when you want to whip up something delicious without spending hours in the kitchen. Trust me, your loved ones will be impressed, and you’ll feel like a culinary rockstar!
Why You’ll Love This Pizza de Pão
Let’s be real—who doesn’t love a dish that’s quick, easy, and downright delicious? This Pizza de Pão checks all the boxes! In just 40 minutes, you can serve up a warm, cheesy delight that’ll have your family begging for seconds. Plus, it’s versatile enough to please even the pickiest eaters. Whether you’re in a rush or just want a comforting meal, this recipe is your new best friend!
Ingredients for Pizza de Pão
Now, let’s dive into the ingredients that make this Pizza de Pão a hit in my kitchen! Each component plays a vital role in creating that perfect blend of flavors and textures. Here’s what you’ll need:
- All-purpose flour: This is the backbone of your dough, giving it structure and chewiness. You can also use whole wheat flour for a healthier twist!
- Baking powder: This little magic powder helps your dough rise, making it light and fluffy. No yeast fuss here!
- Salt: A pinch of salt enhances all the flavors, making every bite more delicious. Don’t skip it!
- Sugar: Just a touch of sugar balances the savory elements and helps the crust brown beautifully.
- Milk: This adds moisture and richness to the dough. You can substitute with almond milk or any non-dairy option if you prefer.
- Vegetable oil: This keeps the dough tender and adds a bit of richness. Olive oil works great too, giving it a lovely flavor.
- Shredded mozzarella cheese: The star of the show! It melts beautifully and gives that gooey, cheesy goodness we all crave.
- Pizza sauce: This is where the flavor party begins! You can use store-bought or whip up a quick homemade version with canned tomatoes and spices.
- Sliced pepperoni: A classic topping that adds a savory kick. If you’re not a fan, feel free to swap it out for veggies or your favorite protein!
- Grated Parmesan cheese: A sprinkle of this adds a salty, nutty flavor that elevates the whole dish.
- Dried oregano: This herb brings a touch of Italian flair. Fresh oregano works too if you have it on hand!
- Garlic powder: A dash of garlic powder adds depth and aroma. If you’re a garlic lover, you can use fresh minced garlic instead.
For exact measurements, don’t forget to check the bottom of the article where you can find everything listed for easy printing. Now, let’s get cooking!
How to Make Pizza de Pão
Now that we have our ingredients ready, let’s get down to the fun part—making this delicious Pizza de Pão! Follow these simple steps, and you’ll have a mouthwatering dish that’s sure to impress. Trust me, it’s easier than you think!
Step 1: Preheat the Oven
First things first, preheat your oven to 400°F (200°C). This is crucial because a hot oven helps the dough rise perfectly. While that’s heating up, lightly grease a 9×13-inch baking dish. You want to make sure your Pizza de Pão doesn’t stick!
Step 2: Prepare the Dough
In a mixing bowl, combine the all-purpose flour, baking powder, salt, and sugar. Whisk them together until they’re well blended. This step is like giving your dry ingredients a little pep talk—mixing them well ensures a consistent dough!
Step 3: Mix Wet Ingredients
Now, pour in the milk and vegetable oil. Stir everything together until a soft and pliable dough forms. It should feel a bit like playdough—soft but not sticky. If it’s too sticky, sprinkle in a bit more flour until it’s just right!
Step 4: Form the Base
Transfer that lovely dough into your greased baking dish. Spread it out evenly, pressing it down firmly to create a solid base. Think of it as making a pizza crust, but a bit thicker. This is where the magic begins!
Step 5: Bake the Dough
Pop the dish into the oven and bake the dough for about 15 minutes. You’re looking for a light golden brown color. This initial bake helps set the base, so it can hold all those delicious toppings without getting soggy!
Step 6: Add Toppings
Once the dough is baked, take it out of the oven and generously spread the pizza sauce over the surface. Don’t be shy—this is where you can really amp up the flavor! Use the back of a spoon to spread it evenly.
Step 7: Layer the Cheese and Pepperoni
Now for the fun part! Layer the shredded mozzarella cheese over the sauce, followed by the pepperoni slices. If you’re feeling adventurous, you can add extra toppings like bell peppers or olives. Finish it off with a sprinkle of grated Parmesan cheese for that extra oomph!
Step 8: Season and Bake Again
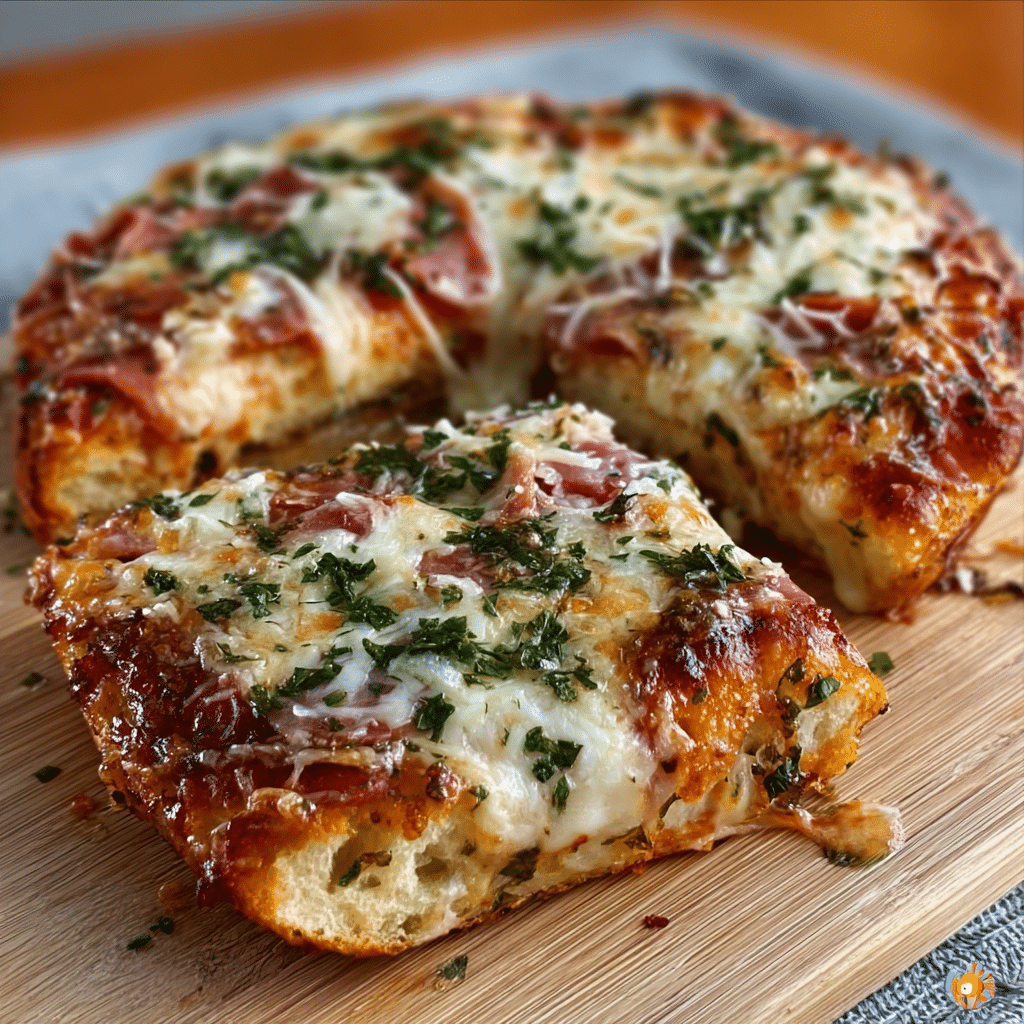
Dust the top with dried oregano and garlic powder. This adds a lovely aroma and flavor that’ll make your kitchen smell divine! Place the dish back in the oven and continue baking for another 10-15 minutes. You want the cheese to be beautifully melted and bubbling—just like a pizza should be!
Step 9: Serve
Once it’s out of the oven, let it cool for a few moments. This is the hardest part—waiting! Then, cut it into squares and serve warm. Your family will be lining up for seconds, I promise!
Tips for Success
- Make sure your baking dish is well-greased to prevent sticking.
- Don’t skip the pre-baking step; it keeps the base from getting soggy.
- Feel free to customize toppings based on your family’s preferences.
- For a crispier crust, bake a few extra minutes at the end.
- Let it cool slightly before cutting to avoid messy squares!
Equipment Needed
- Mixing bowl: A large bowl for combining ingredients. A sturdy pot can work in a pinch!
- Whisk: For blending dry ingredients. A fork will do if you don’t have one.
- Baking dish: A 9×13-inch dish is ideal, but any similar-sized oven-safe dish will work.
- Spatula: For spreading sauce and toppings. A spoon can also get the job done!
Variations
- Vegetarian Delight: Swap out the pepperoni for a colorful mix of bell peppers, mushrooms, and olives. This not only adds flavor but also makes it a vibrant dish!
- Spicy Kick: Add jalapeño slices or crushed red pepper flakes to the top before the final bake for a spicy twist that’ll wake up your taste buds!
- Cheesy Extravaganza: Mix in different cheeses like cheddar or gouda with the mozzarella for a richer flavor profile. You can never have too much cheese, right?
- Herb Infusion: Experiment with fresh herbs like basil or thyme instead of dried oregano for a fresher taste. Just sprinkle them on top before baking!
- Gluten-Free Option: Use a gluten-free all-purpose flour blend to make this dish suitable for those with gluten sensitivities. Just ensure your baking powder is also gluten-free!
Serving Suggestions
- Fresh Salad: Pair your Pizza de Pão with a crisp garden salad for a refreshing contrast.
- Garlic Bread: Serve alongside warm garlic bread for an extra indulgent meal.
- Wine Pairing: A light red wine, like Pinot Noir, complements the flavors beautifully.
- Presentation: Cut into fun shapes for kids or serve on a colorful platter to impress guests!
FAQs about Pizza de Pão
Got questions about making the perfect Pizza de Pão? You’re not alone! Here are some common queries I’ve encountered, along with my answers to help you out:
1. Can I make Pizza de Pão ahead of time?
Absolutely! You can prepare the dough and toppings in advance. Just assemble everything and store it in the fridge. When you’re ready to bake, pop it in the oven straight from the fridge, adding a few extra minutes to the baking time.
2. What can I substitute for pepperoni?
If pepperoni isn’t your thing, no worries! You can use sliced turkey, chicken, or even a medley of veggies like bell peppers, mushrooms, and spinach. The beauty of Pizza de Pão is its versatility!
3. How do I store leftovers?
Leftover Pizza de Pão can be stored in an airtight container in the fridge for up to 3 days. To reheat, pop it in the oven at 350°F (175°C) for about 10 minutes, or until warmed through. You’ll love how it tastes just as good the next day!
4. Can I freeze Pizza de Pão?
Yes, you can freeze it! Just make sure it’s completely cooled before wrapping it tightly in plastic wrap and then aluminum foil. It can last in the freezer for up to 2 months. When you’re ready to enjoy, thaw it in the fridge overnight and reheat as mentioned above.
5. Is Pizza de Pão suitable for kids?
Definitely! Kids love the cheesy goodness and fun toppings. You can even let them customize their own squares with their favorite ingredients. It’s a great way to get them involved in the kitchen!
Final Thoughts
Making Pizza de Pão is more than just whipping up a meal; it’s about creating moments of joy and connection with your loved ones. The aroma wafting through your kitchen, the laughter around the table, and those satisfied smiles as they take their first bite—these are the memories that make cooking worthwhile. Whether it’s a busy weeknight or a cozy weekend gathering, this savory bread is sure to become a family favorite. So roll up your sleeves, gather your ingredients, and let the magic of Pizza de Pão bring warmth and happiness to your home!
“`
Print
Pizza de Pão: Discover the Ultimate Savory Recipe!
- Total Time: 40 minutes
- Yield: 6 servings 1x
- Diet: Vegetarian
Description
Discover the ultimate savory recipe for Pizza de Pão, a delightful bread topped with cheese and pepperoni.
Ingredients
- 2 cups all-purpose flour
- 1 tablespoon baking powder
- 1 teaspoon salt
- 1 tablespoon sugar
- 1 cup milk
- 1/4 cup vegetable oil
- 1 cup shredded mozzarella cheese
- 1/2 cup pizza sauce
- 1/2 cup sliced pepperoni
- 1/4 cup grated Parmesan cheese
- 1 teaspoon dried oregano
- 1 teaspoon garlic powder
Instructions
- Preheat your oven to 400°F (200°C) and lightly grease a 9×13-inch baking dish.
- In a mixing bowl, combine the flour, baking powder, salt, and sugar, whisking them together until well blended.
- Pour in the milk and vegetable oil, stirring until a soft and pliable dough forms.
- Transfer the dough into the greased baking dish, spreading it out evenly and pressing it down firmly to create a base.
- Bake the dough for about 15 minutes, or until it turns a light golden brown.
- Once baked, take it out of the oven and generously spread the pizza sauce over the surface.
- Layer the shredded mozzarella cheese, followed by the pepperoni slices and a sprinkle of grated Parmesan cheese.
- Dust the top with dried oregano and garlic powder.
- Place the dish back in the oven and continue baking for another 10-15 minutes, or until the cheese is beautifully melted and bubbling.
- Let it cool for a few moments before cutting into squares and serving warm.
Notes
- For an extra kick, consider adding jalapeño slices or crushed red pepper flakes before the final bake.
- For a vegetarian version, swap out the pepperoni for an assortment of your favorite vegetables like bell peppers, mushrooms, or olives.
- Prep Time: 15 minutes
- Cook Time: 25 minutes
- Category: Appetizer
- Method: Baking
- Cuisine: Italian
Nutrition
- Serving Size: 1 square
- Calories: 280
- Sugar: 1g
- Sodium: 500mg
- Fat: 12g
- Saturated Fat: 4g
- Unsaturated Fat: 8g
- Trans Fat: 0g
- Carbohydrates: 30g
- Fiber: 1g
- Protein: 10g
- Cholesterol: 20mg




Leave a Comment