gutenberg
Introduction to Spooky Halloween Graveyard Chocolate Poke Cake Recipe
Hey there, fellow home cooks! If you’re anything like me, Halloween sneaks up faster than a ghost in the night. That’s why I’m excited to share my Spooky Halloween Graveyard Chocolate Poke Cake Recipe with you! This delightful dessert is not only a showstopper but also a quick solution for those busy days when you want to impress your loved ones without spending hours in the kitchen. With its rich chocolate flavor and fun graveyard decorations, it’s sure to be a hit at any Halloween gathering. Let’s dive into this spooky treat together!
Why You’ll Love This Spooky Halloween Graveyard Chocolate Poke Cake Recipe
Let’s be honest—life can get hectic, especially when juggling family, work, and everything in between. This Spooky Halloween Graveyard Chocolate Poke Cake Recipe is a lifesaver! It’s easy to whip up, taking just over an hour from start to finish. Plus, the rich chocolate flavor paired with the fun graveyard theme makes it a crowd-pleaser. You’ll love how it brings smiles to faces without draining your energy!
Ingredients for Spooky Halloween Graveyard Chocolate Poke Cake Recipe
Gathering the right ingredients is half the fun of baking! For this Spooky Halloween Graveyard Chocolate Poke Cake Recipe, you’ll need a mix of pantry staples and a few fun decorations. Here’s what you’ll need:
- All-purpose flour: This is the base of your cake, giving it structure and a soft texture.
- Granulated sugar: Sweetness is key! It helps balance the rich cocoa flavor.
- Unsweetened cocoa powder: This is where the chocolate magic happens. It adds depth and richness to your cake.
- Baking powder and baking soda: These leavening agents help your cake rise, making it light and fluffy.
- Salt: Just a pinch enhances all the flavors, making your cake taste even better.
- Large eggs: Eggs bind everything together and add moisture, creating a tender crumb.
- Whole milk: This adds richness and helps create a moist cake. You can substitute with almond or oat milk if needed.
- Vegetable oil: It keeps the cake moist and adds a lovely texture. You can use melted butter for a richer flavor.
- Vanilla extract: A splash of vanilla adds warmth and enhances the chocolate flavor.
- Boiling water: This may sound odd, but it helps to bloom the cocoa powder, intensifying the chocolate flavor.
- Sweetened condensed milk: This is the secret to the poke cake! It soaks into the holes, making the cake incredibly moist and sweet.
- Heavy cream: Whipped into the condensed milk, it adds a creamy texture that makes the cake even more indulgent.
- Chocolate frosting: This is the final touch! It adds a rich layer of sweetness on top.
- Chocolate sandwich cookies: Crushed to create a ‘dirt’ effect, these add a fun texture and flavor.
- Gummy worms and candy tombstones: These are the spooky decorations that make your cake a Halloween masterpiece!
For exact measurements, check the bottom of the article where you can find everything listed for easy printing. Now that you have your ingredients ready, let’s get baking!
How to Make Spooky Halloween Graveyard Chocolate Poke Cake Recipe
Now that we have our ingredients ready, let’s dive into the fun part—making this Spooky Halloween Graveyard Chocolate Poke Cake Recipe! Follow these simple steps, and you’ll have a deliciously spooky dessert that’s sure to impress. Ready? Let’s get started!
Step 1: Preheat and Prepare
First things first, preheat your oven to 350°F (175°C). This ensures your cake bakes evenly and rises beautifully. While that’s heating up, grab a 9×13-inch baking pan and grease it with a little butter or cooking spray. Then, dust it with flour to prevent sticking. Trust me, you don’t want your masterpiece to cling to the pan like a ghost! Once that’s done, you’re ready to mix your dry ingredients.
Step 2: Mix Dry Ingredients
In a large mixing bowl, combine your all-purpose flour, granulated sugar, unsweetened cocoa powder, baking powder, baking soda, and salt. Whisk them together until they’re well blended. This step is crucial because it ensures that all those dry ingredients are evenly distributed, which means a perfectly textured cake. Plus, the aroma of cocoa will have you dreaming of chocolatey goodness already!
Step 3: Add Wet Ingredients
Now it’s time to add the fun stuff! Crack in your large eggs, pour in the whole milk, vegetable oil, and vanilla extract. Using a mixer, beat everything together on medium speed for about 2 minutes until the batter is smooth and creamy. This is where the magic happens! The batter will be thick and luscious, making your cake rich and moist. Just wait until you taste it!
Step 4: Combine with Boiling Water
Here’s a little secret: carefully stir in the boiling water. Yes, it sounds odd, but this step is essential! The hot water helps to bloom the cocoa powder, intensifying that rich chocolate flavor. Your batter will become quite thin, but that’s exactly what you want. Pour this silky mixture into your prepared baking pan, and get ready for some baking magic!
Step 5: Bake the Cake
Pop your cake into the preheated oven and bake for 30-35 minutes. You’ll know it’s done when a toothpick inserted in the center comes out clean. Once baked, let the cake cool in the pan for about 15 minutes. This cooling time is important because it allows the cake to set before you poke those holes. Trust me, you want to give it a little time to relax!
Step 6: Soak the Cake
While your cake is cooling, let’s prepare the soaking mixture. In a separate bowl, whisk together the sweetened condensed milk and heavy cream until smooth. Once your cake has cooled, take the end of a wooden spoon and poke holes all over the top. Pour the creamy mixture evenly over the cake, allowing it to soak into those holes. This is what makes your cake incredibly moist and delicious—like a spooky chocolate sponge!
Step 7: Frost and Decorate
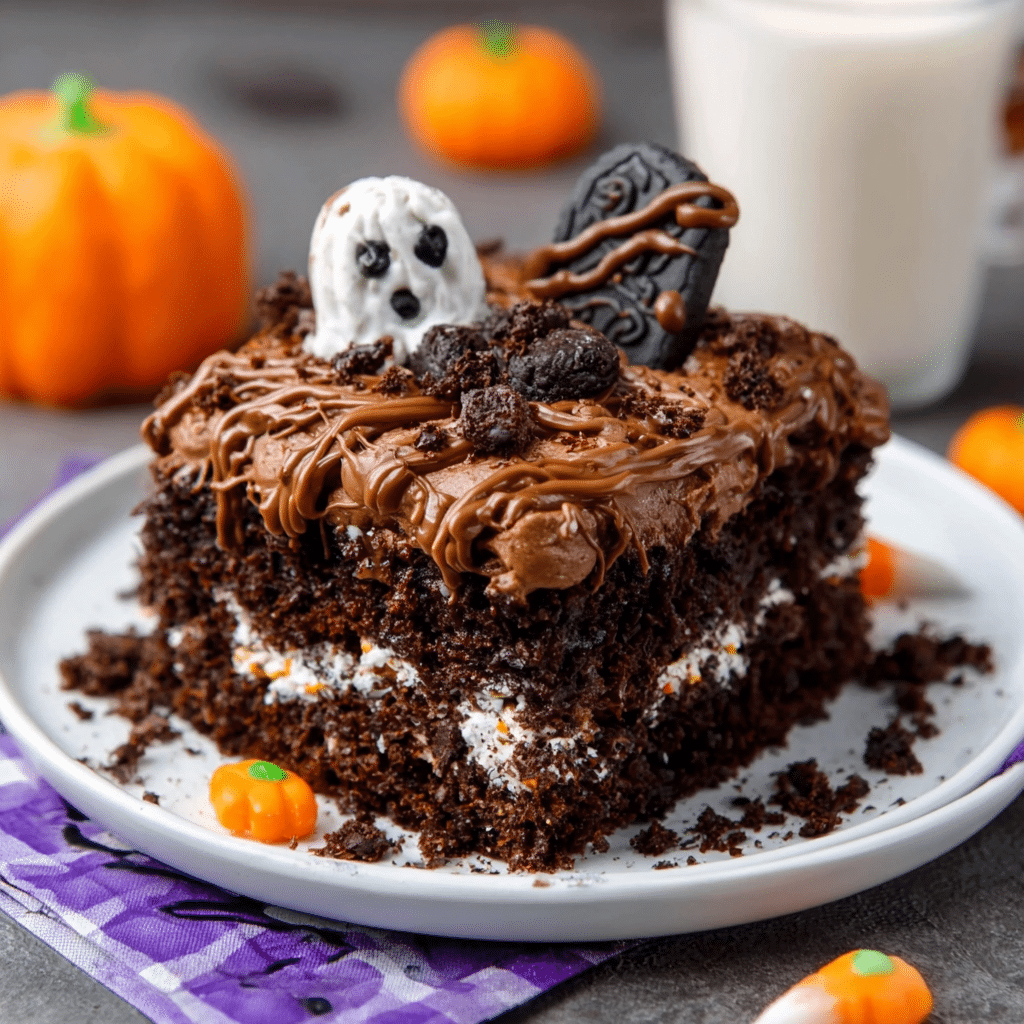
Once your cake has soaked up all that goodness, it’s time to frost! Spread a generous layer of chocolate frosting over the top. Then, sprinkle the crushed chocolate sandwich cookies on top to create that ‘dirt’ effect. Finally, let your creativity shine! Decorate with gummy worms and candy tombstones to complete the graveyard look. Your cake will be as fun to look at as it is to eat!
Step 8: Chill Before Serving
To let all those flavors meld together, chill your cake in the refrigerator for at least 1 hour before serving. This step is crucial for achieving that perfect texture and flavor. Plus, it makes the cake even more refreshing! When you’re ready to serve, slice it up and watch the smiles appear. You’ve just created a spooky masterpiece that’s sure to be the highlight of any Halloween gathering!
Tips for Success
- Make sure all your ingredients are at room temperature for better mixing.
- Don’t skip the boiling water step; it’s key for a moist cake!
- Use a toothpick to check for doneness—if it comes out clean, your cake is ready.
- Let the cake cool completely before poking holes to avoid crumbling.
- Get creative with decorations—let your kids help for extra fun!
Equipment Needed
- 9×13-inch baking pan: A standard size for this cake; you can use a glass or metal pan.
- Mixing bowls: A couple of medium-sized bowls will do; one for dry and one for wet ingredients.
- Electric mixer: A hand mixer works great, but a whisk can do the job too!
- Wooden spoon: Perfect for poking holes in the cake; a skewer can work in a pinch.
- Measuring cups and spoons: Essential for accurate ingredient measurements.
Variations
- Gluten-Free Option: Substitute all-purpose flour with a gluten-free baking blend to make this cake gluten-free. Just ensure your baking powder is also gluten-free!
- Vegan Twist: Replace eggs with flaxseed meal (1 tablespoon flaxseed meal + 2.5 tablespoons water = 1 egg) and use almond or coconut milk instead of whole milk. Swap the heavy cream for coconut cream for a dairy-free version.
- Minty Fresh: Add a few drops of peppermint extract to the batter for a refreshing mint chocolate flavor. Top with crushed mint chocolate candies for an extra kick!
- Peanut Butter Delight: Swirl in some creamy peanut butter into the batter before baking for a deliciously nutty flavor. You can also drizzle melted peanut butter on top before serving.
- Fruit-Filled Surprise: Add a layer of raspberry or cherry pie filling between the cake and frosting for a fruity twist that complements the chocolate beautifully.
Serving Suggestions
- Pair your Spooky Halloween Graveyard Chocolate Poke Cake with a scoop of vanilla ice cream for a delightful contrast.
- Serve with a side of fresh fruit, like strawberries or oranges, to balance the sweetness.
- For drinks, consider spooky-themed beverages like pumpkin spice lattes or a fun Halloween punch.
- Present the cake on a decorative platter with Halloween-themed napkins for an extra festive touch!
FAQs about Spooky Halloween Graveyard Chocolate Poke Cake Recipe
1. Can I make the Spooky Halloween Graveyard Chocolate Poke Cake Recipe ahead of time?
Absolutely! This cake actually tastes even better the next day as the flavors meld together. Just make sure to keep it covered in the refrigerator to maintain its freshness.
2. How do I store leftovers of the Spooky Halloween Graveyard Chocolate Poke Cake?
Store any leftover cake in an airtight container in the refrigerator. It should stay fresh for up to 3-4 days. Just be prepared for the kids to sneak in for a midnight snack!
3. Can I use a different frosting for the Spooky Halloween Graveyard Chocolate Poke Cake Recipe?
Of course! While chocolate frosting is a classic choice, you can use vanilla frosting tinted with orange or green food coloring for a fun twist. Cream cheese frosting also pairs wonderfully with chocolate!
4. What can I use instead of gummy worms and candy tombstones for decoration?
If you want to switch things up, consider using chocolate spiders, candy eyeballs, or even edible glitter for a spooky sparkle. The goal is to have fun and get creative!
5. Is this Spooky Halloween Graveyard Chocolate Poke Cake Recipe suitable for kids?
Definitely! This cake is a hit with kids and adults alike. Just be sure to supervise younger children when decorating, especially if they’re using any small candies or sharp utensils.
Final Thoughts
Creating the Spooky Halloween Graveyard Chocolate Poke Cake Recipe is more than just baking; it’s about making memories with family and friends. The joy of watching your loved ones’ faces light up as they dig into this deliciously spooky treat is priceless. Plus, it’s a fantastic way to bring everyone together during the Halloween season. Whether you’re hosting a party or just looking for a fun dessert to enjoy at home, this cake is sure to be a hit. So roll up your sleeves, embrace the fun, and let your creativity shine in the kitchen!
“`
Print
Spooky Halloween Graveyard Chocolate Poke Cake Recipe: Delightful Fun!
- Total Time: 1 hour 55 minutes
- Yield: 12 servings 1x
- Diet: Vegetarian
Description
A delightful and spooky Halloween-themed chocolate poke cake that is perfect for any Halloween celebration.
Ingredients
- 2 cups all-purpose flour
- 2 cups granulated sugar
- 3/4 cup unsweetened cocoa powder
- 1 1/2 teaspoons baking powder
- 1 1/2 teaspoons baking soda
- 1 teaspoon salt
- 2 large eggs
- 1 cup whole milk
- 1/2 cup vegetable oil
- 2 teaspoons vanilla extract
- 1 cup boiling water
- 1 (14-ounce) can sweetened condensed milk
- 1 cup heavy cream
- 1 cup chocolate frosting
- 1 package (8 ounces) chocolate sandwich cookies, crushed
- Gummy worms and candy tombstones for decoration
Instructions
- Preheat your oven to 350°F (175°C). Grease and flour a 9×13-inch baking pan.
- In a large mixing bowl, combine the flour, sugar, cocoa powder, baking powder, baking soda, and salt. Whisk until well blended.
- Add the eggs, milk, vegetable oil, and vanilla extract to the dry ingredients. Beat on medium speed for 2 minutes until smooth.
- Stir in the boiling water until the batter is well combined (the batter will be thin). Pour the batter into the prepared baking pan.
- Bake for 30-35 minutes, or until a toothpick inserted in the center comes out clean. Allow the cake to cool in the pan for about 15 minutes, then poke holes all over the cake using the end of a wooden spoon.
- In a separate bowl, whisk together the sweetened condensed milk and heavy cream. Pour this mixture evenly over the cake, allowing it to soak into the holes.
- Let the cake cool completely, then spread the chocolate frosting over the top.
- Sprinkle the crushed chocolate sandwich cookies over the frosting to create a ‘dirt’ effect. Decorate with gummy worms and candy tombstones to complete the graveyard look.
- Chill the cake in the refrigerator for at least 1 hour before serving to allow the flavors to meld.
Notes
- This recipe serves 12.
- For a fun twist, you can add green food coloring to the frosting for a spooky effect.
- Alternatively, use vanilla frosting and tint it with orange food coloring for a pumpkin-themed graveyard.
- Prep Time: 20 minutes
- Cook Time: 35 minutes
- Category: Dessert
- Method: Baking
- Cuisine: American
Nutrition
- Serving Size: 1 slice
- Calories: 350
- Sugar: 30g
- Sodium: 200mg
- Fat: 15g
- Saturated Fat: 5g
- Unsaturated Fat: 10g
- Trans Fat: 0g
- Carbohydrates: 45g
- Fiber: 2g
- Protein: 5g
- Cholesterol: 50mg









Leave a Comment