gutenberg
Introduction to Lavender Vanilla Bean Ice Cream Sandwiches
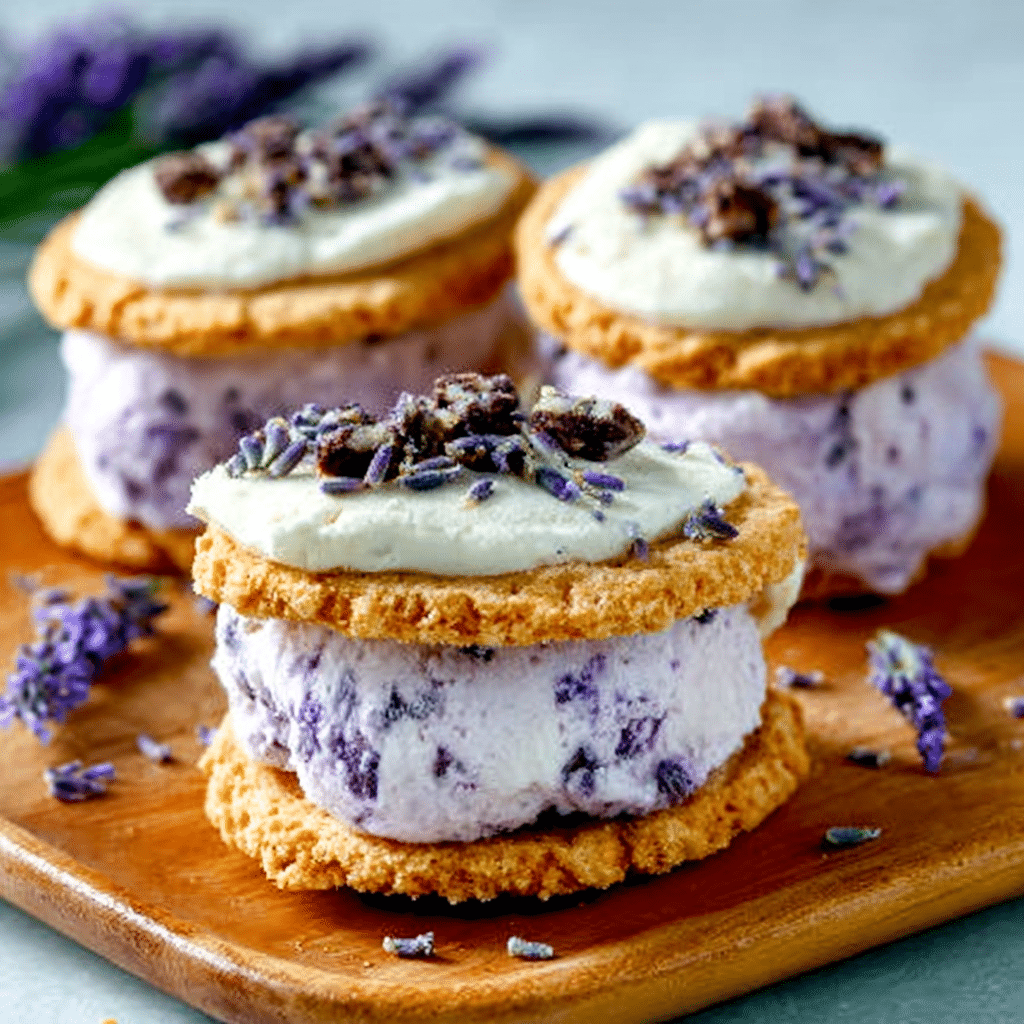
Hey there, fellow home cooks! If you’re anything like me, you know that life can get a bit hectic, especially when juggling family, work, and everything in between. That’s why I’m excited to share my delightful recipe for Lavender Vanilla Bean Ice Cream Sandwiches. These treats are not only a quick solution for a busy day but also a charming way to impress your loved ones. Imagine soft, buttery cookies hugging creamy, lavender-infused vanilla ice cream—pure bliss! Trust me, this recipe is as easy as pie, and it’ll have everyone asking for seconds.
Why You’ll Love This Lavender Vanilla Bean Ice Cream Sandwiches
Let’s be honest—who doesn’t love a dessert that’s both easy to make and absolutely delicious? These Lavender Vanilla Bean Ice Cream Sandwiches are a breeze to whip up, making them perfect for busy weeknights or last-minute gatherings. The unique flavor of lavender adds a touch of elegance, while the creamy ice cream and soft cookies create a delightful contrast. Plus, they’re sure to impress your family and friends, leaving them wanting more!
Ingredients for Lavender Vanilla Bean Ice Cream Sandwiches
Before we dive into the fun of making these delightful Lavender Vanilla Bean Ice Cream Sandwiches, let’s gather our ingredients. Here’s what you’ll need:
- Vanilla Ice Cream: The star of the show! Choose a high-quality vanilla ice cream for the best flavor. You can even opt for a dairy-free version if you prefer.
- Culinary Lavender Buds: These little flowers add a unique floral note. Make sure to use culinary-grade lavender, as other types can be too strong or even toxic.
- All-Purpose Flour: This is the base for our cookies. If you’re looking for a gluten-free option, you can substitute with a gluten-free flour blend.
- Baking Powder: This helps our cookies rise and become fluffy. It’s a must-have for that perfect texture!
- Sea Salt: Just a pinch enhances the sweetness and balances the flavors. You can use regular salt if that’s what you have on hand.
- Unsalted Butter: Softened butter is key for creamy cookies. If you’re in a pinch, margarine can work, but the flavor won’t be quite the same.
- White Sugar: This sweetens our cookies and helps them spread nicely while baking.
- Brown Sugar: Packed brown sugar adds moisture and a hint of caramel flavor. You can substitute with coconut sugar for a healthier twist.
- Large Egg: This binds everything together. If you’re vegan, you can use a flax egg or applesauce as a substitute.
- Pure Vanilla Extract: A splash of this adds depth to the cookie flavor. Always go for pure over imitation for the best taste.
- White Chocolate Chunks or Chocolate Chips (optional): These are a delightful addition if you want a little extra sweetness and texture. Feel free to skip them if you prefer a more traditional cookie.
For exact measurements, check the bottom of the article where you can find everything listed for easy printing. Now that we have our ingredients ready, let’s get cooking!
How to Make Lavender Vanilla Bean Ice Cream Sandwiches
Now that we have our ingredients ready, let’s dive into the fun part—making these delightful Lavender Vanilla Bean Ice Cream Sandwiches. Follow these simple steps, and you’ll have a delicious treat in no time!
Step 1: Infuse the Ice Cream
Start by gently warming the slightly melted vanilla ice cream in a saucepan over low heat. This step is crucial because it allows the lavender buds to infuse their lovely flavor into the ice cream. Stir in 1 tablespoon of culinary lavender and let it steep for about 10 minutes. The aroma will be heavenly! After that, strain the mixture to remove the lavender buds and return the ice cream to its container. Pop it in the freezer until solid, which should take about 2 hours. Trust me, the wait will be worth it!
Step 2: Prepare the Baking Sheets
While the ice cream is freezing, preheat your oven to 350°F (175°C). Line two baking sheets with parchment paper. This will prevent the cookies from sticking and make cleanup a breeze. If you don’t have parchment paper, a silicone baking mat works just as well!
Step 3: Mix Dry Ingredients
In a separate bowl, combine 1 cup of all-purpose flour, 1/2 teaspoon of baking powder, and 1/4 teaspoon of sea salt. Whisk them together until they’re well mixed. This step ensures that the baking powder is evenly distributed, which is key for fluffy cookies. Set this bowl aside for now.
Step 4: Cream Butter and Sugars
In a large mixing bowl, beat together 1/2 cup of softened unsalted butter with 1/2 cup of white sugar and 1/4 cup of packed brown sugar. Use an electric mixer or a sturdy wooden spoon—whatever you have on hand. Mix until the mixture becomes light and fluffy, which usually takes about 2-3 minutes. This step is where the magic happens, as it creates a lovely texture for your cookies!
Step 5: Combine Wet and Dry Ingredients
Next, add in 1 large egg and 1 teaspoon of pure vanilla extract to the butter-sugar mixture. Mix until everything is fully blended. Now, gradually fold the dry mixture into the wet ingredients, stirring until just combined. Be careful not to overmix; we want our cookies to be tender and soft. If you’re feeling adventurous, gently mix in 1/2 cup of white chocolate chunks or chocolate chips at this stage for an extra treat!
Step 6: Shape the Cookies
Using a tablespoon, scoop out portions of dough and place them onto the lined baking sheets, making sure to space them about 2 inches apart. This gives them room to spread while baking. Use the back of a spoon to slightly flatten each mound of dough. This little trick helps them bake evenly and gives a nice shape!
Step 7: Bake the Cookies
Pop the baking sheets into your preheated oven and bake for 10-12 minutes, or until the edges turn a light golden brown. Keep an eye on them, as oven times can vary. Once they’re done, allow the cookies to cool on the sheets for about 5 minutes before transferring them to a wire rack to cool completely. The smell wafting through your kitchen will be irresistible!
Step 8: Assemble the Sandwiches
Once the cookies are completely cool, it’s time to assemble your sandwiches! Take one cookie and place a generous scoop of your lavender-infused vanilla ice cream on its flat side. Top it with another cookie, pressing down gently to form a sandwich. Repeat this process until all your cookies and ice cream are used up. You’ll be amazed at how beautiful they look!
Step 9: Freeze for Best Results
For the best experience, wrap each ice cream sandwich in plastic wrap and place them in the freezer for an additional 30 minutes before serving. This step helps the ice cream firm up a bit, making them easier to eat. Plus, it gives you a little time to clean up the kitchen and prepare for the compliments that are sure to come your way!
Tips for Success
- Make sure your butter is at room temperature for easy creaming.
- Don’t skip the chilling time for the ice cream; it enhances the flavor!
- Use a cookie scoop for uniform cookie sizes—this ensures even baking.
- Experiment with different mix-ins like nuts or dried fruits for a twist.
- Store leftovers in an airtight container to keep them fresh longer.
Equipment Needed
- Mixing Bowls: A set of various sizes is handy. If you only have one, just wash it between steps!
- Electric Mixer: Great for creaming butter and sugars. A whisk works too, just a bit more elbow grease!
- Baking Sheets: Essential for cookies. If you don’t have two, bake in batches.
- Parchment Paper: For easy cleanup. Silicone mats are a fantastic alternative!
- Ice Cream Scoop: Perfect for portioning ice cream. A regular spoon can work in a pinch!
Variations
- Chocolate Lavender Ice Cream Sandwiches: Swap the vanilla ice cream for chocolate ice cream for a rich twist on the classic flavor.
- Gluten-Free Option: Use a gluten-free flour blend in place of all-purpose flour to make these sandwiches suitable for gluten-sensitive friends.
- Vegan Version: Substitute the butter with coconut oil and use a plant-based ice cream to create a delicious vegan treat.
- Fruit-Infused Ice Cream: Add a layer of fresh berries or a fruit puree to the ice cream for a refreshing burst of flavor.
- Nutty Delight: Incorporate chopped nuts like almonds or pistachios into the cookie dough for added crunch and flavor.
Serving Suggestions
- Fresh Berries: Serve with a side of mixed berries for a refreshing contrast to the creamy ice cream.
- Herbal Tea: Pair with a soothing cup of herbal tea, like chamomile or mint, to enhance the lavender flavor.
- Presentation: Arrange the sandwiches on a beautiful platter, garnished with lavender sprigs for an elegant touch.
- Chocolate Drizzle: Drizzle melted chocolate over the sandwiches for an extra indulgent treat.
FAQs about Lavender Vanilla Bean Ice Cream Sandwiches
1. Can I use store-bought lavender ice cream instead of making my own?
Absolutely! If you’re short on time, using store-bought lavender ice cream is a fantastic shortcut. Just make sure it’s a quality brand to ensure the best flavor in your Lavender Vanilla Bean Ice Cream Sandwiches.
2. How do I store leftover ice cream sandwiches?
To keep your sandwiches fresh, wrap each one in plastic wrap and store them in an airtight container in the freezer. They should last for about a week, but I doubt they’ll last that long once your family gets a taste!
3. Can I make these ice cream sandwiches ahead of time?
Yes! You can prepare the cookies and the lavender-infused ice cream a day in advance. Just assemble the sandwiches when you’re ready to serve. This makes them perfect for parties or gatherings!
4. What if I can’t find culinary lavender?
If culinary lavender is hard to find, you can order it online or check specialty grocery stores. Alternatively, you can skip it and use vanilla bean ice cream for a simpler version of these delicious sandwiches.
5. Are there any dietary modifications I can make?
Definitely! You can make these Lavender Vanilla Bean Ice Cream Sandwiches gluten-free by using a gluten-free flour blend. For a vegan option, substitute the butter with coconut oil and use a plant-based ice cream. Enjoy experimenting!
Final Thoughts
Creating these Lavender Vanilla Bean Ice Cream Sandwiches is more than just a cooking project; it’s a delightful experience that brings joy to both the maker and the eater. The combination of soft cookies and creamy, floral ice cream is like a warm hug on a busy day. Plus, they’re perfect for sharing with family and friends, making any gathering feel special. So, whether you’re treating yourself or impressing guests, these sandwiches are sure to bring smiles all around. Trust me, once you take that first bite, you’ll be hooked on this sweet, aromatic delight!
“`
Print
Lavender Vanilla Bean Ice Cream Sandwiches Delightfully Easy!
- Total Time: 2 hours 32 minutes
- Yield: 8 ice cream sandwiches 1x
- Diet: Vegetarian
Description
Delightfully easy Lavender Vanilla Bean Ice Cream Sandwiches made with lavender-infused vanilla ice cream and soft cookies.
Ingredients
- 2 cups vanilla ice cream, slightly melted
- 1 tablespoon culinary lavender buds
- 1 cup all-purpose flour
- 1/2 teaspoon baking powder
- 1/4 teaspoon sea salt
- 1/2 cup unsalted butter, at room temperature
- 1/2 cup white sugar
- 1/4 cup packed brown sugar
- 1 large egg
- 1 teaspoon pure vanilla extract
- 1/2 cup white chocolate chunks or chocolate chips (optional)
Instructions
- Gently warm the softened vanilla ice cream in a saucepan over low heat. Stir in the culinary lavender and allow it to infuse for about 10 minutes. Strain the mixture to remove the lavender and return the ice cream to its container. Freeze until solid, approximately 2 hours.
- Preheat your oven to 350°F (175°C) and prepare two baking sheets by lining them with parchment paper.
- In a separate bowl, combine the flour, baking powder, and sea salt, whisking them together until well mixed.
- In a large mixing bowl, beat the softened butter with both sugars until the mixture becomes light and fluffy. Incorporate the egg and vanilla extract, mixing until everything is fully blended.
- Gradually fold the dry mixture into the wet ingredients, stirring until just combined. If desired, gently mix in the white chocolate chunks or chocolate chips.
- Scoop tablespoon-sized portions of dough onto the lined baking sheets, ensuring they are spaced about 2 inches apart. Use the back of a spoon to slightly flatten each mound of dough.
- Bake for 10-12 minutes, or until the edges turn a light golden brown. Allow the cookies to cool on the sheets for 5 minutes before transferring them to a wire rack to cool completely.
- Once the cookies are cool, take one cookie and place a generous scoop of the lavender-infused vanilla ice cream on its flat side. Top it with another cookie, pressing down gently to form a sandwich. Continue this process until all cookies and ice cream are used.
- For optimal enjoyment, wrap each ice cream sandwich in plastic wrap and place them in the freezer for an additional 30 minutes before serving.
Notes
- Serves 8
- Prep Time: 20 minutes
- Cook Time: 12 minutes
- Category: Dessert
- Method: Baking
- Cuisine: American
Nutrition
- Serving Size: 1 sandwich
- Calories: 250
- Sugar: 18g
- Sodium: 150mg
- Fat: 12g
- Saturated Fat: 7g
- Unsaturated Fat: 3g
- Trans Fat: 0g
- Carbohydrates: 32g
- Fiber: 1g
- Protein: 3g
- Cholesterol: 30mg






Leave a Comment