gutenberg
Introduction to Nanaimo Bars
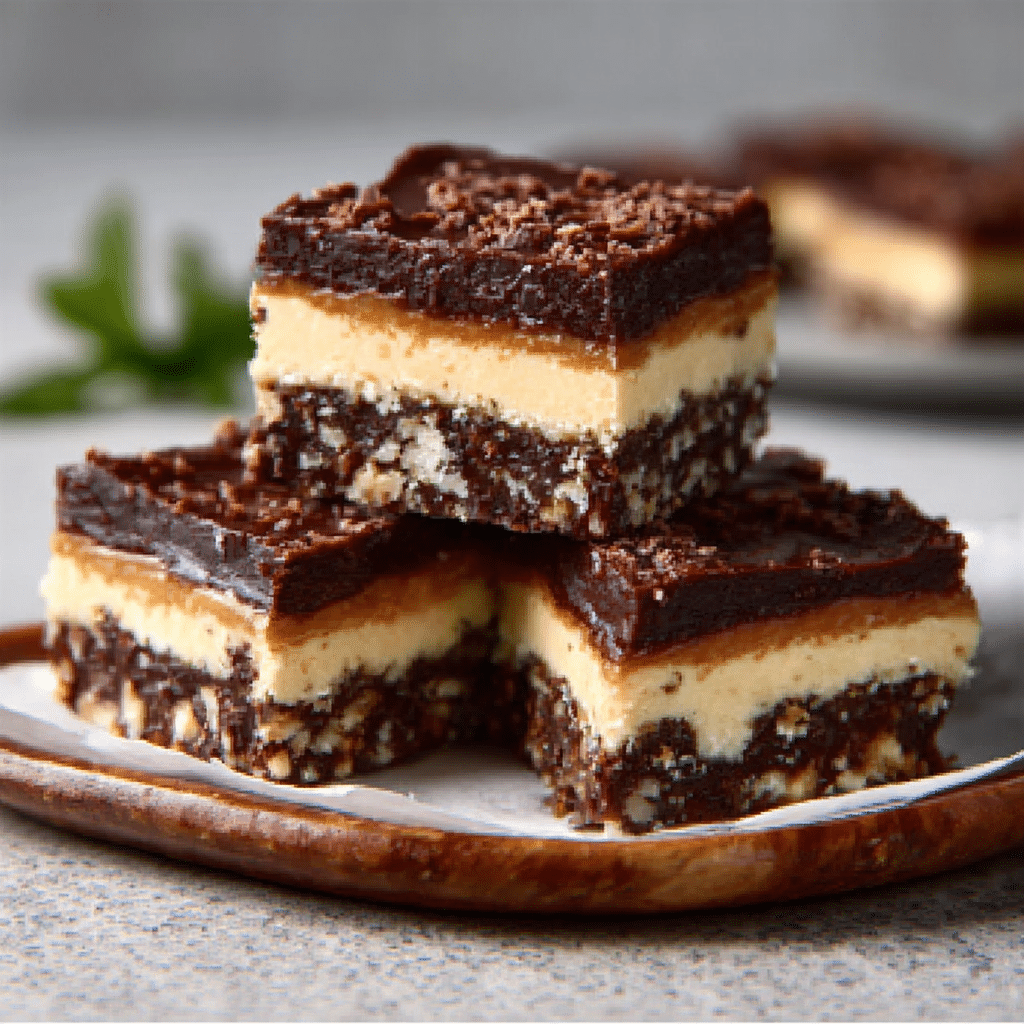
Hey there, fellow dessert lovers! If you’re anything like me, you know that life can get pretty hectic, especially when juggling family, work, and everything in between. That’s why I’m excited to share my love for Nanaimo Bars with you! These delightful, no-bake chocolate treats are not only easy to whip up, but they also bring a smile to everyone’s face. Imagine layers of creamy chocolate goodness melting in your mouth—pure bliss! Whether you need a quick solution for a busy day or a sweet treat to impress your loved ones, Nanaimo Bars are the answer. Let’s dive into this delicious adventure together!
Why You’ll Love This Nanaimo Bars
Let me tell you, these Nanaimo Bars are a game-changer! They’re incredibly easy to make, which is a lifesaver for busy days. You can whip them up in just 20 minutes, and the best part? No baking required! Plus, the rich, layered flavors will have your family begging for more. Trust me, once you try these, they’ll become your go-to dessert for any occasion!
Ingredients for Nanaimo Bars
Now that you’re as excited as I am about making these Nanaimo Bars, let’s talk about the ingredients you’ll need. Don’t worry; they’re all pretty straightforward and easy to find at your local grocery store. Here’s what you’ll gather:
- Crushed Graham Crackers: These form the base of your bars, giving them that delightful crunch and sweetness. You can use store-bought or crush your own for a fresher taste.
- Cocoa Powder: This adds a rich chocolate flavor to the graham cracker layer. Make sure to use unsweetened cocoa for the best results.
- Icing Sugar: Also known as powdered sugar, this sweetens the layers and helps create that smooth texture we all love.
- Desiccated Coconut: This ingredient adds a lovely chewiness and a hint of tropical flavor. If you’re not a coconut fan, feel free to leave it out!
- Unsalted Butter: Softened butter is key for binding the base together and adding richness. Unsalted is best, so you can control the saltiness.
- Large Egg: A lightly beaten egg helps to hold the graham cracker mixture together. If you prefer a vegan option, you can substitute it with a flax egg.
- Unsweetened Chocolate: This is melted down for the middle layer, giving it that deep chocolate flavor. Look for high-quality chocolate for the best taste.
- Milk: Just a splash helps to create a smooth consistency in the chocolate layer. You can use any type of milk you prefer—dairy or non-dairy!
- Vanilla Essence: A touch of vanilla enhances the flavors beautifully. It’s like a warm hug for your taste buds!
- Semi-Sweet Chocolate: This is melted for the top layer, providing that glossy finish and a sweet bite. Again, go for a good quality chocolate for the best results.
For those of you who like to get a little creative in the kitchen, here are some optional ingredients:
- Pecans or Hazelnuts: Chopped nuts can be mixed into the graham cracker layer for an added crunch. They bring a delightful texture and flavor contrast.
- Peppermint Extract: If you’re in the mood for something festive, a dash of peppermint extract in the chocolate layer can give your Nanaimo Bars a refreshing twist.
All the exact measurements for these ingredients are listed at the bottom of the article, so you can easily print them out and take them with you on your next grocery run. Happy baking (or should I say, no-baking)!
How to Make Nanaimo Bars
Now that we’ve gathered all our ingredients, it’s time to roll up our sleeves and get to the fun part—making these delicious Nanaimo Bars! I promise, it’s easier than you might think. Just follow these simple steps, and you’ll have a delightful treat ready to impress your family and friends.
Step 1: Prepare the Base
First things first, let’s create that scrumptious base. In a mixing bowl, combine the crushed graham crackers, cocoa powder, icing sugar, desiccated coconut, and softened butter. Use a fork or your hands to mix everything together until it resembles wet sand. It should hold together when you squeeze it. If it’s too crumbly, just add a bit more butter.
Once it’s well mixed, take a greased 8-inch square baking dish and firmly press this mixture into the bottom. Make sure it’s even and compact—this will be the foundation of your Nanaimo Bars. Trust me, a solid base makes all the difference!
Step 2: Make the Chocolate Layer
Now, let’s move on to the chocolate layer, which is where the magic happens! In a small saucepan, melt the unsweetened chocolate and 2 tablespoons of butter over low heat. Stir continuously until it’s smooth and glossy. Be patient; this part is crucial for that rich flavor!
Once melted, let it cool for a few minutes. In another bowl, mix together the icing sugar, milk, and vanilla essence. Then, pour in the cooled chocolate mixture and stir until you achieve a silky consistency. This layer is going to be heavenly!
Spread this chocolate layer evenly over the graham cracker base. Use a spatula to smooth it out, making sure it covers every inch. You want each bite to be filled with that luscious chocolate goodness!
Step 3: Add the Top Layer
We’re almost there! For the final layer, melt the semi-sweet chocolate with the remaining 2 tablespoons of butter in a saucepan over low heat, just like you did before. Stir until it’s completely melted and smooth.
Once melted, pour this chocolate mixture over the previous layer. Again, use a spatula to spread it evenly. This glossy top layer is what makes Nanaimo Bars so irresistible! It’s like the cherry on top, but way better.
Step 4: Chill and Serve
Now comes the hardest part—waiting! Place your dish in the refrigerator for at least 2 hours, or until the layers are firm. I know, the anticipation can be tough, but trust me, it’s worth it!
Once set, take the dish out and slice it into squares. You can cut them as big or small as you like, but I recommend bite-sized pieces for easy snacking. Enjoy your delightful Nanaimo Bars with a cup of coffee or tea, and watch your loved ones devour them in no time!
Tips for Success
- Make sure your butter is softened for easy mixing; it should be at room temperature.
- Press the graham cracker base firmly to avoid crumbling when you cut the bars.
- Let the chocolate layers cool slightly before spreading to prevent melting the base.
- For a cleaner cut, use a sharp knife dipped in hot water to slice the bars.
- Store leftovers in an airtight container in the fridge for up to a week.

Equipment Needed
- Mixing Bowl: A large bowl for combining ingredients. Any size will do, but a sturdy one is best.
- Spatula: Perfect for spreading layers. A silicone spatula works wonders!
- 8-inch Square Baking Dish: Essential for shaping your bars. A glass or metal dish will work.
- Small Saucepan: For melting chocolate. A double boiler can be used if you prefer.
- Measuring Cups and Spoons: Handy for precise ingredient amounts. If you don’t have them, use a regular coffee mug!
Variations of Nanaimo Bars
- Nutty Delight: Add 1/2 cup of finely chopped pecans or hazelnuts to the graham cracker base for a delightful crunch and extra flavor.
- Minty Fresh: Incorporate 1/2 teaspoon of peppermint extract into the chocolate layer for a refreshing twist that’s perfect for the holidays.
- Vegan Version: Substitute the egg with a flax egg (1 tablespoon ground flaxseed mixed with 2.5 tablespoons water) and use dairy-free chocolate and butter alternatives.
- Gluten-Free Option: Swap out the graham crackers for gluten-free cookies or crushed gluten-free oats to make these bars suitable for gluten-sensitive friends.
- Fruit Infusion: Mix in 1/4 cup of dried cranberries or chopped dried apricots into the graham cracker layer for a fruity surprise!
Serving Suggestions for Nanaimo Bars
- Pair with Coffee: Enjoy your Nanaimo Bars with a hot cup of coffee or espresso for a delightful afternoon treat.
- Serve with Ice Cream: A scoop of vanilla or chocolate ice cream on the side adds a creamy contrast.
- Presentation: Dust with cocoa powder or icing sugar before serving for a beautiful finish.
- Garnish: Top with fresh berries or mint leaves for a pop of color and freshness.
FAQs about Nanaimo Bars
1. What are Nanaimo Bars?
Nanaimo Bars are delicious, no-bake chocolate treats that originated in Canada. They consist of three distinct layers: a crumbly graham cracker base, a creamy custard-flavored middle layer, and a rich chocolate topping. They’re perfect for satisfying your sweet tooth without turning on the oven!
2. How long do Nanaimo Bars last?
When stored in an airtight container in the refrigerator, Nanaimo Bars can last up to a week. However, I doubt they’ll last that long once your family gets a taste of them! Just make sure to keep them chilled to maintain their texture.
3. Can I make Nanaimo Bars ahead of time?
Absolutely! Nanaimo Bars are a fantastic make-ahead dessert. You can prepare them a day or two in advance, allowing the flavors to meld beautifully. Just remember to keep them refrigerated until you’re ready to serve!
4. Are there any substitutions I can make in the recipe?
Yes! If you’re looking for alternatives, you can use gluten-free cookies instead of graham crackers for a gluten-free version. For a vegan option, substitute the egg with a flax egg and use dairy-free chocolate and butter. The beauty of Nanaimo Bars is their versatility!
5. Can I freeze Nanaimo Bars?
Yes, you can freeze Nanaimo Bars! Just cut them into squares, wrap them tightly in plastic wrap, and place them in an airtight container. They can be frozen for up to three months. When you’re ready to enjoy them, simply thaw them in the fridge overnight.
Final Thoughts
Making Nanaimo Bars is more than just whipping up a dessert; it’s about creating sweet memories with your loved ones. The joy of slicing into those perfectly layered bars and watching everyone’s eyes light up is simply priceless. Whether you’re enjoying them with a cup of coffee or sharing them at a family gathering, these treats bring a little bit of happiness to any occasion. So, roll up your sleeves, gather your ingredients, and let the magic happen in your kitchen. Trust me, once you make these Nanaimo Bars, they’ll become a cherished favorite in your home!
“`
Print
Nanaimo Bars: Discover Your New Favorite Chocolate Treat!
- Total Time: 2 hours 30 minutes
- Yield: 16 servings 1x
- Diet: Vegetarian
Description
Nanaimo Bars are decadent layered chocolate treats that are easy to make and delicious to eat.
Ingredients
- 1 cup crushed graham crackers
- 1/2 cup cocoa powder
- 1/2 cup icing sugar
- 1/2 cup desiccated coconut
- 1/2 cup softened unsalted butter
- 1 large egg, lightly beaten
- 1/2 cup unsweetened chocolate, finely chopped
- 2 tablespoons unsalted butter
- 1 cup icing sugar
- 2 tablespoons milk
- 1 teaspoon vanilla essence
- 4 ounces semi-sweet chocolate, finely chopped
- 2 tablespoons unsalted butter
Instructions
- In a mixing bowl, blend the crushed graham crackers, cocoa powder, icing sugar, desiccated coconut, and softened butter until the mixture resembles wet sand.
- Incorporate the beaten egg into the mixture and stir until everything is well combined. Firmly press this mixture into the base of a greased 8-inch square baking dish to form an even layer.
- In a small saucepan, melt the unsweetened chocolate and 2 tablespoons of butter over low heat, stirring continuously until smooth. Allow it to cool for a few minutes.
- In another bowl, combine the icing sugar, milk, and vanilla essence. Mix in the cooled chocolate mixture until you achieve a silky consistency. Spread this chocolate layer evenly over the graham cracker base.
- In a separate saucepan, melt the semi-sweet chocolate with 2 tablespoons of butter over low heat, stirring until fully melted and smooth. Pour this chocolate mixture over the previous layer and spread it out evenly.
- Place the dish in the refrigerator for a minimum of 2 hours or until the layers are firm. Once set, slice into squares and enjoy your delightful treat.
Notes
- For an added crunch, mix in 1/2 cup of finely chopped pecans or hazelnuts into the graham cracker layer.
- To create a festive minty flavor, incorporate 1/2 teaspoon of peppermint extract into the chocolate layer for a refreshing twist.
- Prep Time: 20 minutes
- Cook Time: 10 minutes
- Category: Dessert
- Method: No-Bake
- Cuisine: Canadian
Nutrition
- Serving Size: 1 bar
- Calories: 200
- Sugar: 10g
- Sodium: 50mg
- Fat: 12g
- Saturated Fat: 7g
- Unsaturated Fat: 3g
- Trans Fat: 0g
- Carbohydrates: 18g
- Fiber: 1g
- Protein: 2g
- Cholesterol: 20mg


Leave a Comment