gutenberg
Introduction to Peanut Butter Banana Cream Pie Jars
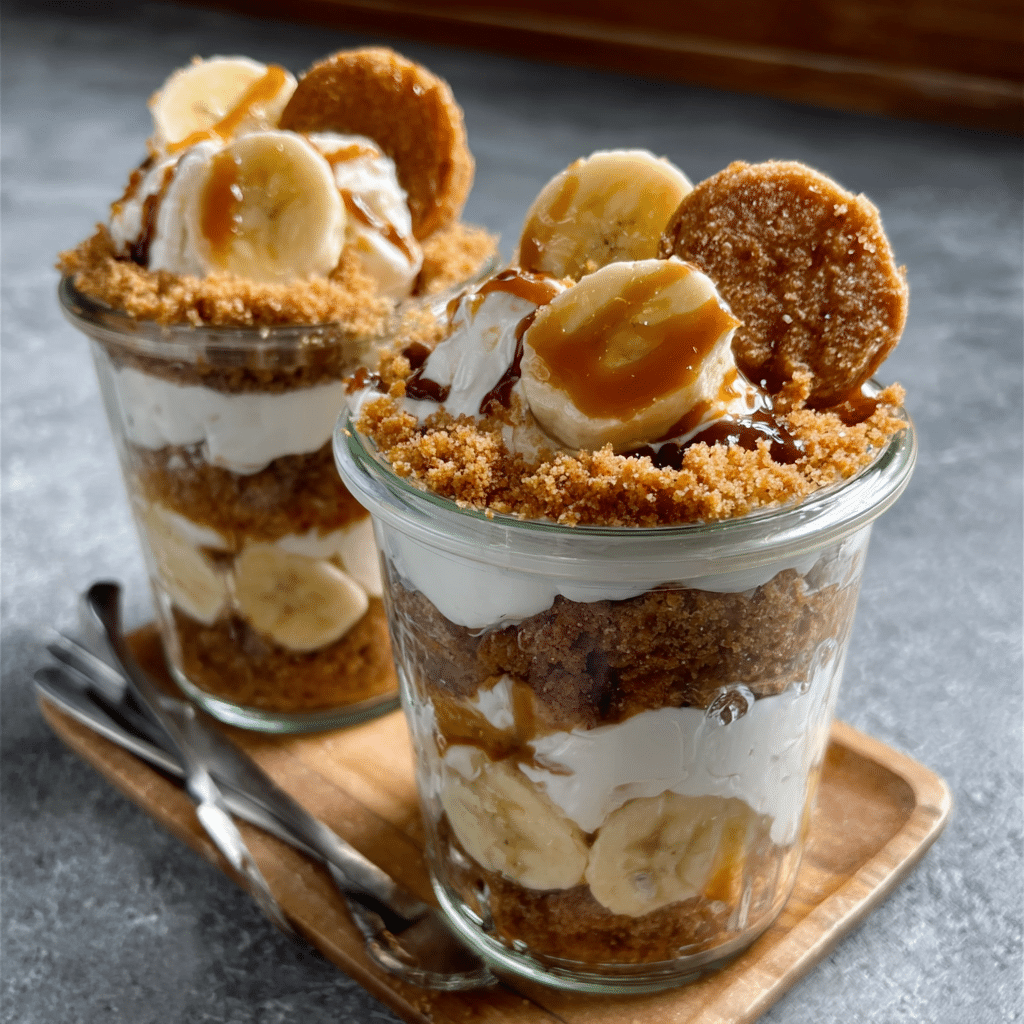
Hey there, fellow dessert lovers! If you’re anything like me, you know that life can get pretty hectic, especially when juggling family, work, and everything in between. That’s why I’m excited to share my recipe for Peanut Butter Banana Cream Pie Jars. These little delights are not only a breeze to whip up, but they also bring a smile to everyone’s face. Imagine creamy peanut butter, fresh bananas, and a crunchy graham cracker base all layered in a cute jar. It’s the perfect sweet treat to impress your loved ones or simply indulge yourself after a long day!
Why You’ll Love This Peanut Butter Banana Cream Pie Jars
Let’s be honest—who doesn’t love a dessert that’s quick, easy, and downright delicious? These Peanut Butter Banana Cream Pie Jars check all the boxes! They come together in just 20 minutes, making them a lifesaver for busy weeknights or last-minute gatherings. Plus, the combination of creamy peanut butter and sweet bananas is a flavor match made in heaven. Trust me, your taste buds will thank you!
Ingredients for Peanut Butter Banana Cream Pie Jars
Gathering the right ingredients is half the fun of making Peanut Butter Banana Cream Pie Jars. Here’s what you’ll need to create this delightful dessert:
- Smooth Peanut Butter: The star of the show! It adds that rich, nutty flavor that pairs perfectly with bananas.
- Confectioners’ Sugar: This sweetener gives the peanut butter cream its delightful sweetness and smooth texture.
- Pure Vanilla Extract: A splash of vanilla enhances the overall flavor, making it even more irresistible.
- Heavy Cream: Whipping this up creates a light and airy texture for the peanut butter layer. It’s what makes each bite feel like a cloud!
- Ripe Bananas: Fresh bananas add natural sweetness and a lovely creaminess. Make sure they’re ripe for the best flavor!
- Crushed Graham Crackers: These provide a crunchy base that contrasts beautifully with the creamy layers. You can crush them yourself or buy pre-crushed for convenience.
- Melted Unsalted Butter: This helps bind the graham cracker crumbs together, creating a delicious crust.
- Mini Chocolate Chips (optional): For those who love a little extra sweetness, these tiny treats add a delightful crunch and chocolatey goodness.
- Whipped Cream for Garnish (optional): A dollop on top makes everything look fancy and adds a creamy finish.
Feel free to get creative! If you’re looking for a lighter version, you can swap in light peanut butter and whipped topping. And if bananas aren’t your thing, try using berries or other fruits for a unique twist. The exact quantities for each ingredient are listed at the bottom of the article, so you can easily print them out for your next baking adventure!
How to Make Peanut Butter Banana Cream Pie Jars
Now that you have all your ingredients ready, let’s dive into the fun part—making these delightful Peanut Butter Banana Cream Pie Jars! Follow these simple steps, and you’ll have a delicious dessert that’s sure to impress.
Step 1: Prepare the Graham Cracker Base
First things first, let’s get that graham cracker base ready! In a mixing bowl, combine your crushed graham crackers with the melted unsalted butter. Use a fork or your hands to mix them together until the crumbs are fully coated and resemble wet sand. This step is crucial because it creates that crunchy texture we all love. If you’re feeling a bit lazy, you can buy pre-crushed graham crackers to save time!
Step 2: Layer the Graham Cracker Mixture
Next, grab your cute dessert cups or jars. Place a generous layer of the graham cracker mixture at the bottom of each cup. You want enough to create a solid base, so don’t be shy! Press it down gently with the back of a spoon to make sure it holds together. This layer is like the foundation of a house—strong and sturdy!
Step 3: Make the Peanut Butter Cream
Now, let’s whip up that creamy peanut butter layer! In a separate bowl, pour in your heavy cream. Using an electric mixer, whip it until soft peaks form. This usually takes about 2-3 minutes. Once you’ve got those lovely peaks, gently fold in the smooth peanut butter, confectioners’ sugar, and pure vanilla extract. Be careful not to deflate the whipped cream; we want it light and airy! This creamy mixture is what makes these jars so irresistible.
Step 4: Layer the Peanut Butter Cream
Time to layer that delicious peanut butter cream over the graham cracker base! Spoon the peanut butter mixture into each cup, filling them about halfway. Use a spatula to smooth it out evenly. This layer is where the magic happens, so take your time to make it look pretty. You want to see those beautiful swirls of peanut butter cream peeking through!
Step 5: Add Banana Slices
Now, let’s bring in the bananas! Take your ripe bananas and slice them into thin rounds. Arrange a layer of banana slices atop the peanut butter cream in each jar. The bananas not only add sweetness but also a lovely creaminess that complements the peanut butter perfectly. Plus, they make everything look so colorful and inviting!
Step 6: Repeat the Layering Process
Ready for round two? Repeat the layering process! Start with another layer of the graham cracker mixture, followed by more peanut butter cream, and finish with another layer of banana slices. Keep going until your cups are filled to the top. Don’t worry if they look a little messy; that just adds to their charm! Each layer brings a new texture and flavor, making every bite a delightful surprise.
Step 7: Add Optional Toppings
Now for the fun part—toppings! If you’re feeling a bit indulgent, sprinkle some mini chocolate chips over the last layer of banana slices. They add a delightful crunch and a touch of chocolatey goodness. And don’t forget to top each cup with a swirl of whipped cream for that extra flair. It’s like putting a cherry on top, but even better!
Step 8: Chill and Serve
Finally, it’s time to let these beauties chill in the refrigerator for at least an hour. This step is essential because it allows all the flavors to meld together beautifully. Plus, it makes the dessert nice and refreshing when you’re ready to serve. Once chilled, grab a spoon and dig in! You’ll be amazed at how delicious these Peanut Butter Banana Cream Pie Jars are!
Tips for Success
- Use ripe bananas for the best flavor and creaminess.
- Don’t overmix the whipped cream; fold gently to keep it light.
- Chill the jars for at least an hour to enhance the flavors.
- Feel free to customize with your favorite toppings or fruits.
- Make extra graham cracker base for a crunchier texture if desired.
Equipment Needed
- Mixing Bowls: A couple of medium-sized bowls will do. You can also use a large measuring cup if you’re short on space.
- Electric Mixer: A hand mixer is perfect, but a whisk works too if you’re feeling strong!
- Dessert Cups or Jars: Any small cups or mason jars will work beautifully for serving.
- Spatula: A rubber spatula is great for folding and smoothing out layers.
Variations
- Nut Butter Swap: Try almond or cashew butter instead of peanut butter for a different nutty flavor.
- Fruit Alternatives: Swap bananas for strawberries, blueberries, or even peaches for a fresh twist on the classic.
- Gluten-Free Option: Use gluten-free graham crackers or crushed nuts as a base for a gluten-free dessert.
- Vegan Version: Substitute heavy cream with coconut cream and use a plant-based whipped topping for a vegan-friendly treat.
- Low-Sugar Option: Replace confectioners’ sugar with a sugar substitute like stevia or erythritol for a lower-sugar version.
Serving Suggestions
- Pair your Peanut Butter Banana Cream Pie Jars with a hot cup of coffee or a chilled glass of almond milk for a delightful contrast.
- For a festive touch, garnish with fresh mint leaves or a sprinkle of cocoa powder.
- Serve alongside a light fruit salad for a refreshing balance.
- Consider using clear jars to showcase those beautiful layers!
FAQs about Peanut Butter Banana Cream Pie Jars
Got questions about these delightful Peanut Butter Banana Cream Pie Jars? You’re not alone! Here are some common queries I’ve come across, along with my answers to help you out:
1. Can I make Peanut Butter Banana Cream Pie Jars ahead of time?
Absolutely! These jars are perfect for making ahead. Just prepare them a day in advance and store them in the refrigerator. This allows the flavors to meld beautifully, making them even more delicious when you’re ready to serve!
2. How long do these jars last in the fridge?
These Peanut Butter Banana Cream Pie Jars can last up to 3 days in the fridge. However, I recommend enjoying them within 1-2 days for the freshest taste, especially since bananas can brown over time.
3. Can I use crunchy peanut butter instead of smooth?
Of course! If you love a bit of texture, feel free to use crunchy peanut butter. It adds a delightful crunch to the creamy layers, making each bite even more interesting!
4. What can I substitute for heavy cream?
If you’re looking for a lighter option, you can substitute heavy cream with whipped topping or coconut cream. Both will give you a lovely texture while keeping the dessert light and airy.
5. Are there any nut-free alternatives for this recipe?
Yes! If you need a nut-free version, you can use sun butter or soy nut butter instead of peanut butter. They provide a similar creamy texture and flavor without the nuts, making it safe for those with allergies.
Final Thoughts
Creating these Peanut Butter Banana Cream Pie Jars is more than just whipping up a dessert; it’s about bringing joy to your kitchen and smiles to your loved ones. Each layer tells a story of comfort and indulgence, making them perfect for any occasion. Whether you’re treating yourself after a long day or impressing guests at a gathering, these jars are sure to be a hit. Plus, they’re so easy to make that you’ll find yourself reaching for this recipe time and time again. So, grab your ingredients and let the sweet memories begin!
“`
Print
Peanut Butter Banana Cream Pie Jars: A Sweet Delight!
- Total Time: 1 hour 20 minutes
- Yield: 4 servings 1x
- Diet: Vegetarian
Description
Peanut Butter Banana Cream Pie Jars are a delightful dessert combining creamy peanut butter, fresh bananas, and a crunchy graham cracker base, perfect for satisfying your sweet tooth.
Ingredients
- 1 cup smooth peanut butter
- 1 cup confectioners’ sugar
- 1 teaspoon pure vanilla extract
- 1 cup heavy cream
- 2 ripe bananas, sliced
- 1 cup crushed graham crackers
- 2 tablespoons melted unsalted butter
- 1/4 cup mini chocolate chips (optional)
- Whipped cream for garnish (optional)
Instructions
- Begin by mixing the crushed graham crackers with the melted butter in a bowl until the crumbs are fully coated and resemble wet sand.
- Take small dessert cups or jars and place a generous layer of the graham cracker mixture at the bottom of each.
- In a separate bowl, whip the heavy cream until it forms soft peaks, then carefully fold in the peanut butter, confectioners’ sugar, and vanilla extract until everything is smoothly blended.
- Layer the peanut butter cream over the graham cracker base in each cup, filling them about halfway.
- Arrange a layer of banana slices atop the peanut butter cream.
- Repeat the layering process: add more graham cracker mixture, followed by another layer of the peanut butter cream, and finish with more banana slices until the cups are filled to the top.
- If you like, sprinkle mini chocolate chips over the last layer of banana slices for an extra treat.
- Top each cup with a swirl of whipped cream for a delightful finish.
- Place the cups in the refrigerator for at least an hour to let the flavors come together beautifully.
Notes
- For a lighter twist, consider using light peanut butter and whipped topping.
- You can also swap out bananas for berries or other fruits to create a unique flavor experience.
- Prep Time: 20 minutes
- Cook Time: 0 minutes
- Category: Dessert
- Method: No-bake
- Cuisine: American
Nutrition
- Serving Size: 1 jar
- Calories: 450
- Sugar: 20g
- Sodium: 200mg
- Fat: 30g
- Saturated Fat: 10g
- Unsaturated Fat: 15g
- Trans Fat: 0g
- Carbohydrates: 30g
- Fiber: 2g
- Protein: 10g
- Cholesterol: 30mg





Leave a Comment