Introduction to Stained Glass Cookies
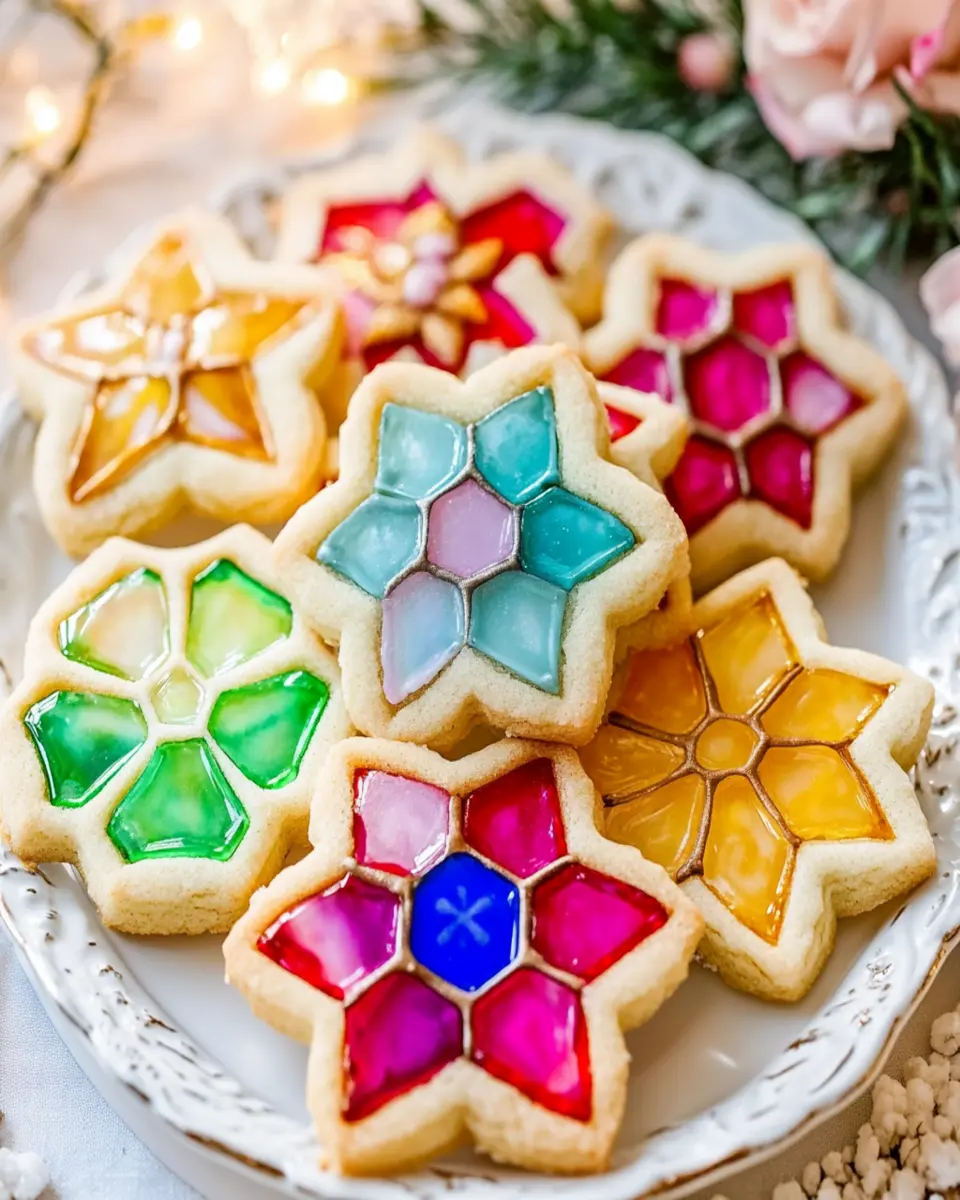
Stained glass cookies are a festive treat that brings a splash of color to any occasion. These delightful cookies, with their vibrant candy-filled centers, are perfect for celebrations, holidays, or simply to brighten your day. They combine a buttery, sweet cookie base with the fun of melting hard candies, creating an eye-catching and delicious dessert.
Imagine biting into a cookie that not only looks beautiful but also has a sweet and slightly chewy surprise in the middle. The combination of textures—from the crisp edges to the gooey candy center—makes each bite an experience to savor. Whether you’re hosting a party or looking for a fun family baking project, these cookies are sure to impress. Plus, they’re easy to make, allowing you to spend more time enjoying the company of friends and family.
As you gather your ingredients and roll out the dough, consider this: what colors will you choose for your stained glass? The beauty of these cookies lies in their customization. You can use various hard candies to create different hues, making each batch unique. It’s a fantastic way to express creativity in the kitchen while also creating a delightful treat that everyone will love. Get ready to bake some memories with stained glass cookies that shine as brightly as the moments you share with loved ones.
Key Ingredients
Stained glass cookies are as colorful as they are delicious, thanks to a few key ingredients that come together to create their unique flavor and appearance.
Unsalted Butter (1 cup)
Unsalted butter is the foundation of these cookies, providing a rich, creamy flavor that enhances the overall taste. Softened at room temperature, it blends beautifully with sugar to create a smooth dough.
Granulated Sugar (1 cup)
Granulated sugar adds sweetness and helps to achieve the perfect texture. It not only sweetens the cookies but also contributes to their tender crumb when creamed with butter.
Egg (1 large)
The egg acts as a binder, helping to hold the dough together and providing moisture. It adds richness and aids in achieving a soft, chewy texture.
Vanilla Extract (1 teaspoon)
Vanilla extract brings warmth and depth to the flavor profile of the cookies. Its aromatic qualities elevate the taste, making each bite more enjoyable.
All-Purpose Flour (3 cups)
All-purpose flour is the main structure builder in these cookies. It provides the necessary gluten to give the cookies their shape and texture.
Salt (1/2 teaspoon)
A pinch of salt enhances the sweetness and balances the flavors, ensuring that the cookies are not overly sweet. It also plays a role in strengthening the dough.
Baking Powder (1/2 teaspoon)
Baking powder is a leavening agent that helps the cookies rise slightly during baking, contributing to their soft and tender texture.
Crushed Hard Candies (1 cup)
The star ingredient, crushed hard candies, adds the stained glass effect. As they melt in the center of the cookies, they create a beautiful, colorful filling that is both eye-catching and delicious.
These ingredients come together to make stained glass cookies a delightful treat that brightens any occasion.

Why You’ll Love This Recipe
Stained glass cookies are not just visually stunning; they are a delightful combination of flavors and textures that make them irresistible. With a buttery, melt-in-your-mouth cookie base and colorful, chewy candy centers, these cookies are a feast for both the eyes and the taste buds.
Imagine the joy of creating these cookies with friends or family—each one a unique masterpiece filled with vibrant colors! They are perfect for any occasion, whether it’s a holiday gathering or a simple treat to brighten your week. Plus, they offer a fun and interactive baking experience, as you can choose different colors of hard candies to customize your cookies.
Not to mention, stained glass cookies are relatively easy to make, making them ideal for busy young professionals who want to whip up something special without spending hours in the kitchen. In just about 40 minutes, you can have a batch of these delightful cookies ready to share or enjoy yourself. They not only make a delicious snack but also serve as a lovely gift for friends and family. So why not bring some color and sweetness into your kitchen with this exciting recipe?
Variations
Stained glass cookies are incredibly versatile, allowing you to get creative with flavors and colors. You can easily customize this recipe to suit your taste preferences or seasonal themes.
Flavor Variations
Consider adding citrus zest such as lemon or orange to the dough for a refreshing twist. Spices like cinnamon or nutmeg can also enhance the flavor profile, giving your cookies a warm, inviting scent.
Different Candy Choices
While traditional hard candies like Jolly Ranchers work wonderfully, feel free to experiment with other types of candy. Try using gummy candies or even chocolate pieces for a unique take on stained glass cookies. Each candy will melt differently, creating various textures and flavors in the center.
Holiday Themes
For special occasions, you can shape the cookies according to the holiday. Use heart-shaped cutters for Valentine’s Day or star shapes for Christmas. Additionally, coloring the dough with food coloring can create a fun visual effect, making your cookies even more festive.
These variations not only make the cookies more appealing but also allow you to make them a reflection of your personality or the season. Enjoy the process of creating your own unique stained glass cookies!

Cooking Tips and Notes
Stained glass cookies are fun to make, but a few cooking tips can elevate your baking experience and ensure they turn out perfectly every time.
Preparing the Dough
When preparing your dough, make sure the butter is softened but not melted. This allows for better incorporation with the sugar, creating a light and airy texture. Additionally, chilling the dough for about 30 minutes before rolling it out can make it easier to handle and help prevent the cookies from spreading too much during baking.
Baking Tips
Keep a close eye on the cookies as they bake. Since oven temperatures can vary, check them around the 8-minute mark. You want the edges to be light golden while the centers remain slightly soft. Once out of the oven, let the cookies cool on the baking sheet for a few minutes before transferring them to a wire rack to cool completely.
Storage Recommendations
To maintain their freshness, store your stained glass cookies in an airtight container. They can last up to a week, making them great for enjoying throughout the week or sharing with friends. If you want to keep them longer, consider freezing them. Just ensure they are well-wrapped to prevent freezer burn.
With these tips, you’ll be on your way to baking beautiful and delicious stained glass cookies that are sure to impress!
Serving Suggestions
Stained glass cookies are not only delicious but also visually striking, making them a perfect treat for various occasions. Here are some creative serving suggestions to enhance your cookie experience.
For Holiday Gatherings
These cookies are a festive addition to any holiday dessert table. Arrange them on a colorful platter alongside other seasonal treats, or hang them as decorations on a Christmas tree using ribbon for a fun and edible ornament.
Pairing with Beverages
Serve your stained glass cookies with a warm cup of tea or coffee. The buttery flavor of the cookies pairs beautifully with the rich notes of a dark brew, while a glass of cold milk complements their sweetness, making them a hit with both kids and adults.
Gift Giving
Stained glass cookies also make for thoughtful homemade gifts. Package them in clear cellophane bags tied with a decorative ribbon or place them in a decorative tin. Include a personalized note to add a special touch, making them a heartfelt gift for friends and family.
These serving suggestions will not only make your stained glass cookies shine but also elevate the overall experience for everyone who enjoys them.

Time Breakdown
When making stained glass cookies, it’s important to manage your time effectively to enjoy the process without feeling rushed. Here’s a quick breakdown:
Preparation
30 minutes: This includes gathering your ingredients, creaming the butter and sugar, and rolling out the dough.
Cooking/Baking
10 minutes: Bake the cookies at 350°F (175°C) until they are light golden and the candy is melted.
Total
40 minutes: In just under an hour, you can have a delightful batch of stained glass cookies ready to share. To save time, consider prepping the dough a day ahead and chilling it overnight!
Nutritional Facts
Understanding the nutritional profile of stained glass cookies can help you enjoy them mindfully. Each cookie contains approximately 150 calories, making them a sweet treat that fits into many diets. With 10 grams of sugar and 7 grams of fat, these cookies offer a satisfying flavor without excessive guilt.
While they are delicious, it’s good to enjoy them in moderation, especially if you’re watching your sugar intake. The cookies are vegetarian-friendly and provide a small amount of protein (1g) per serving. Remember, sharing these vibrant cookies can also make them feel like a lighter indulgence!
FAQ based on “People Also Ask” Section
What are stained glass cookies?
Stained glass cookies are a delightful dessert featuring a buttery cookie dough that is cut into shapes with colorful hard candies melted in the center. They are visually striking and perfect for holidays or special occasions.
How do I store stained glass cookies?
To keep your stained glass cookies fresh, store them in an airtight container at room temperature. They can last up to a week, making them a great treat to have on hand for guests or family members.
Can I customize the colors of stained glass cookies?
Absolutely! You can use any color of hard candies to create different effects in your cookies. This allows you to match the colors to holidays, themes, or personal preferences, making each batch unique.
How long do stained glass cookies take to make?
You can prepare stained glass cookies in about 40 minutes, including prep and baking time. This makes them a quick and enjoyable baking project, perfect for busy young professionals or families.
Conclusion
Stained glass cookies are not just a treat; they are a vibrant expression of creativity and joy. With their colorful centers, these cookies can brighten up any occasion, making them perfect for holidays, parties, or simply a delightful snack at home. The easy-to-follow recipe ensures that even busy young professionals can whip up a batch without hassle.
Sharing these cookies with friends and family is a wonderful way to create lasting memories. They are not only visually appealing but also deliciously satisfying, combining a buttery cookie with the sweet crunch of melted candies. So why not gather your ingredients and try making stained glass cookies today? You might just discover your new favorite treat. Cook, save, share, and enjoy the colorful sweetness that stained glass cookies bring to your life!
Print
Stained Glass Cookies
- Total Time: 40 minutes
- Yield: 24 cookies 1x
- Diet: Vegetarian
Description
These vibrant stained glass cookies are a delightful treat, perfect for holidays and special occasions.
Ingredients
- 1 cup unsalted butter, softened
- 1 cup granulated sugar
- 1 large egg
- 1 teaspoon vanilla extract
- 3 cups all-purpose flour
- 1/2 teaspoon salt
- 1/2 teaspoon baking powder
- 1 cup crushed hard candies (like Jolly Ranchers)
Instructions
- Preheat the oven to 350°F (175°C).
- In a large bowl, cream together the butter and sugar until smooth.
- Beat in the egg and vanilla extract until well combined.
- In another bowl, whisk together the flour, salt, and baking powder.
- Gradually stir the dry ingredients into the butter mixture until combined.
- Roll out the dough on a floured surface to about 1/4 inch thick and cut out shapes.
- Use a smaller cutter to cut out the center of the cookies, leaving a frame.
- Place the cookie frames on a baking sheet and fill the centers with crushed candies.
- Bake for 8-10 minutes, until the edges are light golden and the candy is melted.
- Allow to cool completely before removing from the baking sheet.
Notes
- Store cookies in an airtight container for up to a week.
- You can use any color of hard candies for different effects.
- Prep Time: 30 minutes
- Cook Time: 10 minutes
- Category: Desserts
- Method: Baking
- Cuisine: American
Nutrition
- Serving Size: 1 cookie
- Calories: 150
- Sugar: 10g
- Sodium: 100mg
- Fat: 7g
- Saturated Fat: 4g
- Unsaturated Fat: 2g
- Trans Fat: 0g
- Carbohydrates: 20g
- Fiber: 0g
- Protein: 1g
- Cholesterol: 30mg


Leave a Comment